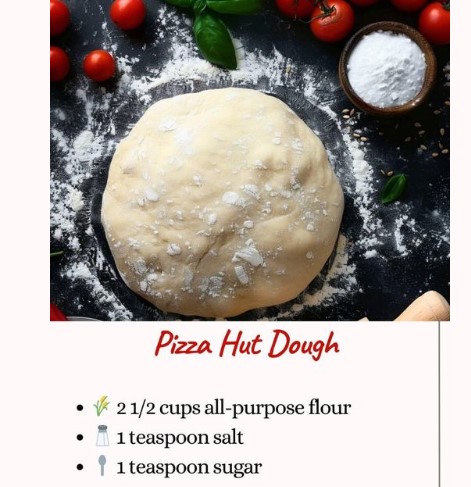
Pizza Hut Dough Recipe
Ingredients:
- 2 1/2 cups all-purpose flour
- 1 teaspoon salt
- 1 teaspoon sugar
- 1 tablespoon active dry yeast
- 1 1/3 cups warm water (about 110°F/45°C)
- 2 tablespoons olive oil
Instructions:
- Combine Dry Ingredients:
- In a large mixing bowl, combine 2 1/2 cups of all-purpose flour, 1 teaspoon of salt, and 1 teaspoon of sugar. Stir the dry ingredients together until they are evenly distributed.
- Activate Yeast:
- In a separate small bowl, dissolve 1 tablespoon of active dry yeast in 1 1/3 cups of warm water (about 110°F/45°C). Let the mixture sit for about 5 minutes until it becomes frothy. This indicates that the yeast is active and ready to use.
- Mix Wet and Dry Ingredients:
- Pour the yeast mixture into the bowl with the dry ingredients. Add 2 tablespoons of olive oil. Using a wooden spoon or a dough hook on a stand mixer, mix until the ingredients come together to form a dough. If the dough is too sticky, you can add a little more flour, a tablespoon at a time, until it reaches the desired consistency.
- Knead the Dough:
- Transfer the dough to a lightly floured surface. Knead the dough for about 10 minutes until it becomes smooth and elastic. To knead, press the dough with the heels of your hands, fold it over, and rotate it a quarter turn. Continue this process until the dough is smooth and elastic. If using a stand mixer, knead on medium speed for about 5-7 minutes.
- First Rise:
- Lightly oil a large bowl with olive oil. Place the kneaded dough in the bowl, turning it to coat all sides with oil. Cover the bowl with a damp cloth or plastic wrap and let the dough rise in a warm, draft-free place for about 1 hour, or until it has doubled in size.
- Prepare the Dough for Baking:
- Once the dough has risen, punch it down to release the air. Turn the dough out onto a lightly floured surface. Divide the dough into 2 equal parts for large pizzas or 4 parts for smaller pizzas. Using a rolling pin or your hands, roll out each portion to your desired thickness and shape. If you prefer a thicker crust, roll out the dough to about 1/2 inch thick. For a thinner crust, roll it out to about 1/4 inch thick.
- Second Rise (Optional):
- For a fluffier crust, let the rolled-out dough rise for another 15-20 minutes before adding toppings. Cover the dough loosely with a towel or plastic wrap while it rises.
- Preheat Oven:
- While the dough is rising, preheat your oven to 475°F (245°C). Place a pizza stone or baking sheet in the oven to preheat as well, which helps achieve a crispy crust.
- Add Toppings and Bake:
- Transfer the rolled-out dough to a piece of parchment paper or a pizza peel dusted with flour or cornmeal. Add your favorite pizza toppings, such as tomato sauce, cheese, vegetables, and meats. Carefully transfer the pizza to the preheated pizza stone or baking sheet in the oven.
- Bake in the preheated oven for 12-15 minutes, or until the crust is golden brown and the cheese is bubbly and melted. Keep an eye on the pizza to prevent burning, especially if you have a lot of toppings.
- Serve:
- Remove the pizza from the oven and let it cool for a few minutes before slicing. This helps the cheese set slightly and makes it easier to cut. Serve hot and enjoy your homemade Pizza Hut-style pizza!
Tips:
- For extra flavor, brush the crust with a mixture of olive oil and minced garlic before baking.
- Experiment with different toppings and cheeses to customize your pizza to your taste.
- If you don’t have a pizza stone, you can use a baking sheet, but the crust might not be as crispy.
Enjoy making and eating your delicious homemade Pizza Hut dough pizza!
- Can you find the book, egg, cup, and pillow?
 Can you find the book, egg, cup, and pillow? Finding hidden items in a picture is a classic pastime that has entertained people of all ages for a very long time. These visual challenges are more than just a game; they are a true workout for your mind. They require you to use your “visual … Read more
 - Balsamic Soy Worcestershire Steak Marinade
 Balsamic Soy Worcestershire Steak Marinade IntroductionThis rich and flavorful steak marinade blends the deep umami of soy sauce and Worcestershire with the slight sweetness of balsamic vinegar. It tenderizes the meat while adding a bold, savory taste that makes every bite juicy and delicious. Perfect for grilling or pan searing. Ingredients1/4 cup soy sauce2 tablespoons … Read more
 - Classic Marinated Ribeye Steak with Garlic Herb Butter
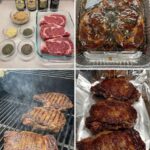
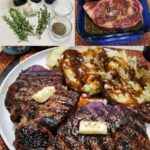 IntroductionThis juicy ribeye steak recipe delivers restaurant-quality flavor at home. Marinated with simple ingredients and finished with rich garlic herb butter, it creates a tender, flavorful dish paired perfectly with mashed potatoes or your favorite sides. Ingredients For the Steak and Marinade2 ribeye steaks1/2 cup soy sauce1/3 cup olive oil1/4 cup lemon juice2 tablespoons Worcestershire … Read more
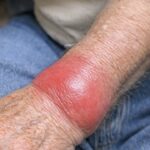
 - My grandmother developed this strange lump on her wrist overnight. What could this be? I am worried because it looks abnormal.
 My grandmother developed this strange lump on her wrist overnight. What could this be? I am worried because it looks abnormal. Discovering an unexpected lump on your grandmother’s wrist can be an unsettling experience. The sudden appearance of any abnormal growth on the body naturally raises concerns about its nature and potential implications for health. … Read more
 - My grandpa s wrist is suddenly red hot and extremely swollen Why is this happening He is in severe pain and we need help
 My grandpa s wrist is suddenly red hot and extremely swollen Why is this happening He is in severe pain and we need help When faced with a sudden and alarming change in a loved one’s health, especially one as painful and visible as a swollen, red wrist, it’s natural to feel a wave of … Read more