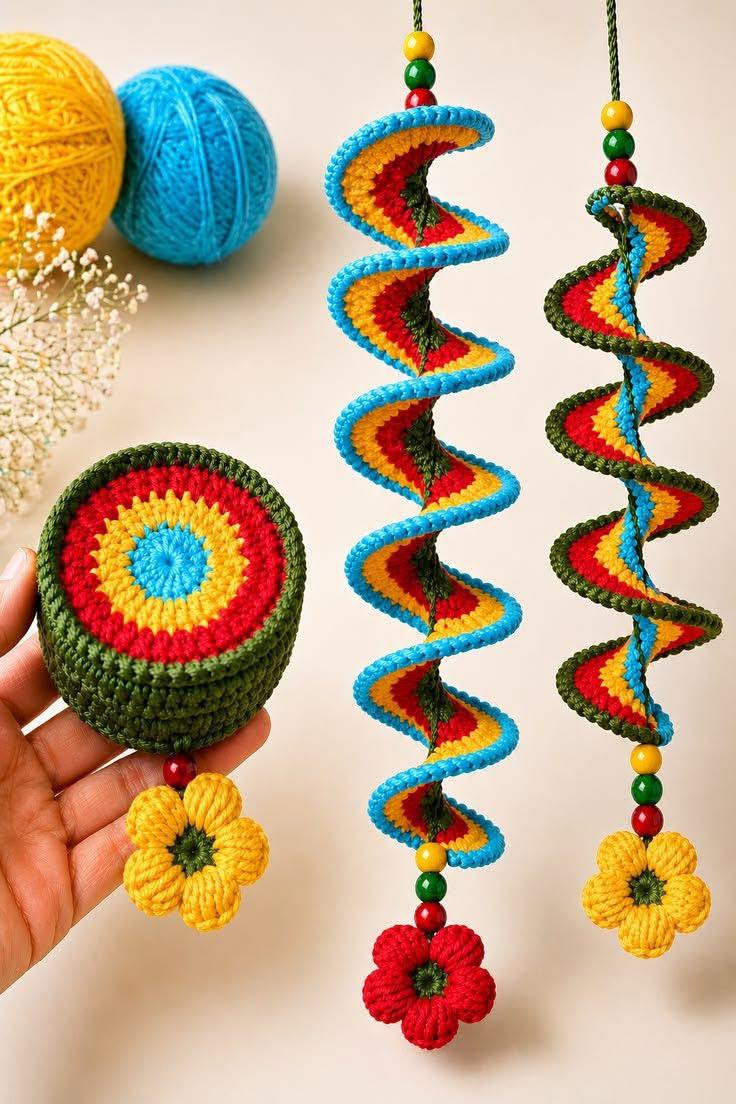
Difficulty: Intermediate
US crochet terminology
Finished length: approximately 35–45 cm, adjustable
Main colors:
- Blue
- Yellow
- Red
- Dark green
Materials
- Cotton yarn in blue, yellow, red and dark green
- Crochet hook suitable for your yarn, approximately 2.5–3 mm
- 3–6 wooden beads
- Tapestry needle
- Fiberfill
- Scissors
- Small amount of black/dark green yarn for flower centers
- Optional: strong cord for hanging
1. Round Crochet Center
Make a small stuffed cylindrical/round ornament.
Front Circle
With blue yarn:
Round 1: 6 sc into a magic ring. (6)
Round 2: 2 sc in each stitch around. (12)
Change to yellow.
Round 3:
1 sc, 2 sc in next stitch around. (18)
Round 4:
2 sc, 2 sc in next stitch around. (24)
Change to red.
Round 5:
3 sc, 2 sc in next stitch around. (30)
Round 6:
4 sc, 2 sc in next stitch around. (36)
Change to dark green.
Round 7:
5 sc, 2 sc in next stitch around. (42)
Fasten off.
You should now have a concentric circle resembling the center of the ornament.
2. Side/Bottom of the Round Ornament
With dark green, attach yarn to the back edge of the circle.
Work approximately:
Rounds 1–4: 42 sc around.
Do not increase. This creates the cylindrical depth visible in the photograph.
Begin stuffing lightly with fiberfill.
Continue:
Round 5: 42 sc
Round 6: 42 sc
Stuff firmly but without making the stitches stretch.
Closing
Sc2tog around until the opening is closed.
Fasten off and weave in the end.
The finished piece should look like a small round crocheted capsule/drum.
3. Spiral Hanging Ribbon
This is the most important part of the design.
The spiral can be made longer or shorter depending on how many turns you want.
The easiest way to reproduce the pictured effect is to crochet a long, narrow, flexible strip, then shape it into a spiral around a central hanging cord.
Strip
Use blue yarn.
Chain 18.
Row 1
Starting in the 2nd chain from hook:
18 sc across. Ch 1, turn.
Row 2
18 sc. Ch 1, turn.
Change to yellow.
Row 3
18 sc. Ch 1, turn.
Row 4
18 sc. Ch 1, turn.
Change to red.
Row 5
18 sc. Ch 1, turn.
Row 6
18 sc. Ch 1, turn.
Change to dark green.
Row 7
18 sc. Ch 1, turn.
Row 8
18 sc. Ch 1, turn.
Repeat these 8-row color blocks until the strip measures approximately 80–100 cm.
For a longer hanging ornament, continue to 120–140 cm.
4. Give the Strip Its Spiral Shape
The photograph shows the crochet strip twisting repeatedly around the center.
Lay the finished strip flat.
Starting at one end, gradually curve it into a spiral:
top → outward → around → inward → outward → around
Continue until you have approximately 4–6 complete turns.
Use small invisible stitches with matching yarn at selected points to hold the spiral shape.
Do not sew every section together—the spaces between the turns are what create the open spiral appearance.
5. Central Hanging Cord
Cut a strong piece of green cord approximately 60–70 cm long.
Fold it in half to create the hanging loop.
Thread the cord through the center of the spiral.
At the top, tie a secure loop.
The spiral should be able to rotate freely around the cord.
6. Wooden Beads
Thread the beads onto the central cord.
A sequence similar to the photograph is:
Yellow → Green → Red
Place a small bead cluster near the top and another near the bottom.
Secure each bead by tying a small knot underneath it.
7. Yellow Crochet Flower
Use yellow yarn.
Center
With dark green:
Round 1: 6 sc into magic ring. (6)
Fasten off.
Petals
Attach yellow yarn around the center.
For each petal:
Ch 5
Work back along the chain:
- Sl st
- sc
- hdc
- 3 dc in final chain
Sl st back into the center.
Repeat 6 times.
You should have 6 rounded petals.
Fasten off and sew the center securely.
Make one yellow flower for the bottom of the ornament.
8. Red Crochet Flower
Use red yarn.
Make the same flower using:
Ch 5
Then:
- Sl st
- sc
- hdc
- 3 dc
Sl st into center.
Repeat 6 times.
Add a small dark-green center.
This flower can be attached to the bottom of the main spiral.
9. Flower Attachment
Use a tapestry needle and matching yarn.
Sew the yellow flower beneath one end of the spiral.
Sew the red flower beneath the other end.
Make several strong stitches through the center of each flower and the cord/ornament behind it.
Hide the yarn tails inside the flower.
10. Assemble the Ornament
The order from top to bottom should be:
Hanging loop
↓
Wooden beads
↓
Crocheted spiral
↓
Bead cluster
↓
Flower
For the second hanging piece:
Hanging loop
↓
Yellow/green/red beads
↓
Spiral
↓
Round crocheted centerpiece
↓
Red bead
↓
Yellow flower
How to Make the Spiral More Curved
For the dramatic shape in the photograph, gently steam/block the finished strip without touching the yarn directly with a hot iron.
Wrap the strip around a cylindrical object or form it by hand into progressively smaller and larger curves.
Allow it to dry completely before removing the support.
This gives the spiral its characteristic 3D corkscrew shape.
Color Arrangement
To closely match the photograph, use the colors in this order:
Outer edge: Blue
Next: Yellow
Next: Red
Center/inner edge: Dark green
For the second version, reverse the dominant outer color:
Dark green → Red → Yellow → Blue
This creates the contrasting pair seen in the image.
Tip
The exact spiral proportions in the photograph depend on the yarn thickness, tension, and how tightly the strip is shaped. If you want a taller, more dramatic spiral, simply make the strip longer; for a shorter ornament, stop earlier.