Finished Size
Approximately 30 × 36 in (76 × 91 cm), depending on yarn and tension.
Materials
- DK/light worsted yarn
- Pale yellow – main color
- White – flower petals
- Crochet hook: 4.0 mm (G/6) or size needed for your yarn
- Yarn needle
- Scissors
Abbreviations
- MR – magic ring
- ch – chain
- sl st – slip stitch
- sc – single crochet
- hdc – half double crochet
- dc – double crochet
- st – stitch
- sp – space
- rep – repeat
Daisy Granny Square
Round 1 – Yellow Center
Make a magic ring.
- Ch 3 (counts as dc).
- Work 11 dc into the ring.
- Sl st to the top of ch 3.
- Pull the ring closed.
12 dc total.
Fasten off yellow.
Round 2 – White Petals
Join white yarn between any two stitches.
For each petal:
- Ch 2.
- Work 3 dc in the same space.
- Ch 2.
- Sl st in the next space.
Repeat around until you have 12 petals.
Sl st to the beginning and fasten off.
Round 3 – Yellow Background
Join yellow yarn in a space between two petals.
For each petal:
- Ch 3.
- 2 dc in the same space.
- Ch 1.
- 3 dc in the next space between petals.
- Ch 1.
Continue around.
Sl st to the beginning ch 3.
Round 4 – Form the Square
Continue with yellow.
Work granny-square clusters around the flower:
3 dc, ch 1 across each side.
At each corner work:
3 dc, ch 2, 3 dc
Continue around all four sides.
Sl st to the beginning.
Round 5 – Final Square Round
Work another round of yellow granny clusters.
- 3 dc in each ch-1 space
- Ch 1 between clusters
- At each corner: 3 dc, ch 2, 3 dc
Fasten off and weave in the ends.
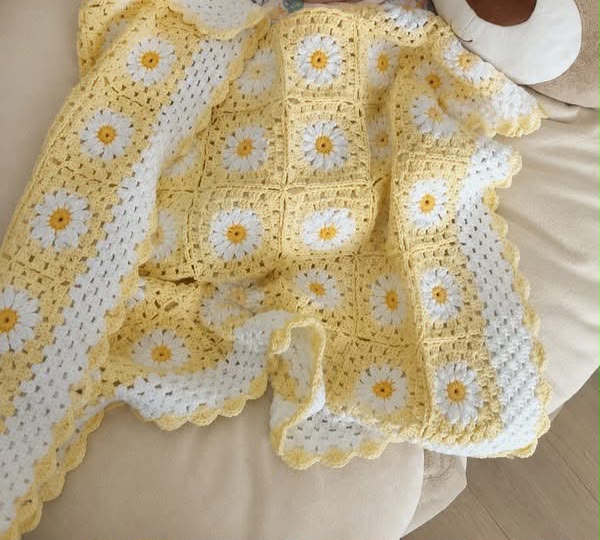
Your finished square should have a white daisy in the center surrounded by pale yellow.
Making the Blanket
Make approximately 48 squares for a 6 × 8 arrangement.
Lay the squares out so the daisies are evenly distributed.
Joining the Squares
Place two squares with the right sides facing upward.
Using yellow yarn:
- Insert your hook through the corresponding stitches of both squares.
- Make sc through both layers.
- Continue across the entire edge.
- Repeat to join all squares.
This creates the raised yellow seams visible in the blanket.
For a flatter join, you can instead use a slip-stitch join through the back loops.
Border
Join yellow yarn in any corner.
Border Round 1
- Ch 3.
- Work 2 dc in the same corner.
- Ch 1.
- Work 3 dc in each space along the edge.
- At each corner: 3 dc, ch 2, 3 dc.
- Continue around.
- Sl st to the beginning.
Border Round 2
Repeat the granny clusters around the entire blanket.
At each corner:
3 dc, ch 2, 3 dc
Fasten off.
Scalloped Edge
Join yellow yarn in a corner space.
Work:
5 dc in the next space, sc in the following space
Repeat around the entire outside edge.
This creates the soft scalloped/fan-shaped edging shown in the photograph.
For a slightly fuller edge, use:
5 dc, sc, 5 dc, sc
around the blanket.
Finishing
- Carefully weave in all yarn tails.
- Gently block the blanket to square the motifs.
- Hand wash or use a gentle cycle according to the yarn manufacturer’s instructions.
- Lay flat to dry.
Baby-safety note: This type of crocheted blanket should be used for supervised cuddling or as a decorative/lap blanket. For infants, avoid leaving a loose blanket in a crib or unattended sleep space because of suffocation and entanglement risks.