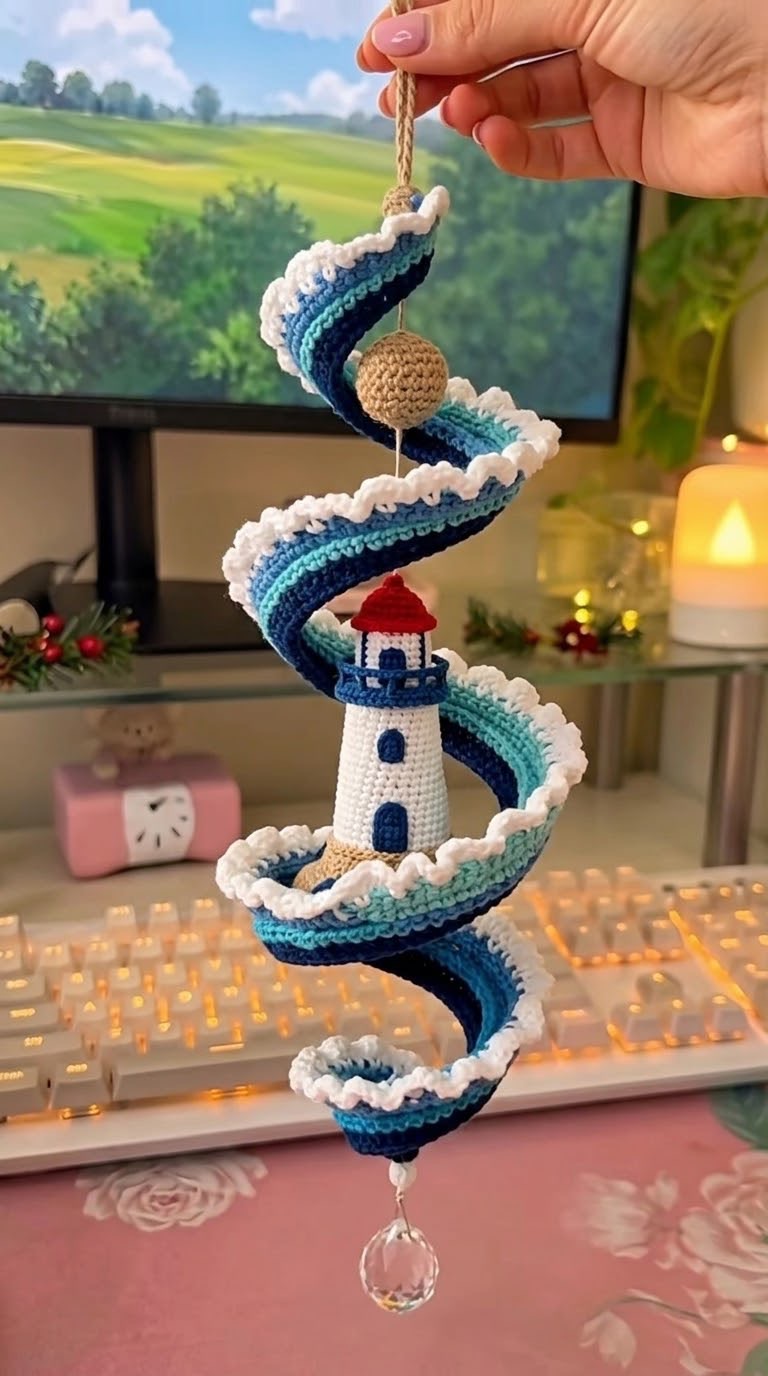
Spiral Lighthouse Hanging Ornament
Finished size
Approximately 35–45 cm (14–18 in) tall, depending on how tightly you shape the spiral.
Materials
DK/light worsted yarn:
Navy blue
Turquoise/teal
Light blue
White
Tan/beige
Red
Crochet hook: 3.0–3.5 mm
Small amount of black/dark blue yarn
Polyester stuffing
Tapestry needle
Stitch marker
Thin craft wire or clear nylon cord for internal support
Small wooden/plastic bead for the center “buoy”
Small hanging crystal/bead
Optional: fabric stiffener or diluted PVA glue
Abbreviations
US terminology:
MR — magic ring
sc — single crochet
hdc — half double crochet
dc — double crochet
sl st — slip stitch
ch — chain
inc — 2 sc in same stitch
dec — sc 2 together
BLO — back loop only
FLO — front loop only
st/sts — stitch/stitches
- Spiral Ocean Ribbon
The large winding blue-and-white piece is easiest to make as a long crocheted strip, then wrap it around the lighthouse.
Use teal.
Row 1
Ch 16.
Starting in 2nd ch from hook:
15 sc
Turn.
Rows 2–8
Ch 1, 15 sc.
Do not fasten off.
This produces the central body of the ocean ribbon.
For the color stripes, change colors approximately as follows:
Rows 1–3: navy
Rows 4–5: turquoise
Rows 6–7: light blue
Row 8: teal
Repeat this color sequence along the length.
Continue
Work approximately 150–180 rows of 15 sc.
You want a ribbon approximately:
4–5 cm wide × 90–110 cm long.
For a more pronounced spiral, make it 110–125 cm long.
Don’t worry if it looks like a long flat strip at this stage.
- Snow edging
The distinctive white “snow” around the ocean ribbon is made separately.
Attach white yarn to one long edge.
Snow edging
Work:
sl st in next st, ch 3, 3 dc in same st, sl st in next st
Repeat along the entire edge.
This creates the fluffy scalloped snow appearance.
For larger snow bumps:
sl st, ch 3, 5 dc in same stitch, sl st
Alternate small and large bumps for the irregular appearance shown in the photograph.
Repeat on the opposite long edge.
Extra fluffy version
For an especially snowy look, use:
sl st, ch 3, 4 dc, ch 1, 4 dc in same stitch, sl st
every 2–3 stitches.
- Forming the spiral
Lay the finished ribbon flat.
Starting at the top, gradually wrap it into a loose spiral.
The photograph has approximately 4½–5 turns.
Suggested diameter:
Top turn: 7–9 cm
Second: 14–16 cm
Middle: 17–20 cm
Lower: 16–19 cm
Bottom: 9–12 cm
Secure each turn to the lighthouse with a few tiny stitches.
Important: Don’t stitch the entire ribbon to the lighthouse. It should remain visually separated and appear to wind around it.
A little stuffing underneath the ribbon can also give it the raised 3-D appearance in the photo.
- Lighthouse tower
Use white.
Base
MR.
Round 1
6 sc into MR. — 6
Round 2
inc around. — 12
Round 3
sc, inc around. — 18
Round 4
2 sc, inc around. — 24
Round 5
3 sc, inc around. — 30
Rounds 6–25
30 sc.
This creates the main cylindrical tower.
Slight taper
Round 26:
3 sc, dec around. — 24
Rounds 27–30:
24 sc.
Stuff lightly as you go.
Bottom
Round 31:
2 sc, dec around. — 18
Round 32:
sc, dec around. — 12
Fasten off and close.
- Lighthouse windows and door
With navy yarn, embroider:
Door
Make a small oval approximately 1.5 × 3 cm.
You can crochet:
Ch 6.
Starting in 2nd chain:
4 sc, 3 sc in last chain, 3 sc along opposite side, 2 sc in final stitch
Sl st and fasten off.
Sew onto the lower front of the lighthouse.
Windows
Make two or three small oval windows in navy.
For each:
MR, 6 sc.
Round 2:
inc around — 12.
Flatten slightly and sew to tower.
The pictured lighthouse has elongated dark-blue windows, so you can stretch the circles vertically when sewing them down.
- Lighthouse balcony
Use navy.
Ch 30 and join.
Work 2–3 rounds of sc.
This makes the balcony railing.
For the vertical railings:
ch 3, sl st into next stitch
Repeat around.
Alternatively, sew individual vertical bars using navy yarn.
Attach the balcony approximately 5–6 cm below the roof.
- Lighthouse roof
Use red.
Round 1
MR, 6 sc.
Round 2
inc around — 12
Round 3
sc, inc around — 18
Round 4
2 sc, inc around — 24
Round 5
24 sc.
Begin taper
Round 6:
2 sc, dec around — 18
Round 7:
sc, dec around — 12
Round 8:
dec around — 6
Fasten off.
Shape the piece into a small conical roof.
Sew it to the top of the lighthouse.
- Lantern room
Use white.
Make a small cylinder:
MR, 6 sc.
Round 2: inc around — 12
Rounds 3–5: 12 sc.
Fasten off and stuff very lightly.
Add navy vertical lines around it to imitate the windows.
Place it beneath the red roof.
- Center buoy/ball
The brown ball in the middle is a small stuffed sphere.
Use tan.
Round 1
MR, 6 sc.
Round 2
inc around — 12
Round 3
sc, inc around — 18
Round 4
2 sc, inc around — 24
Rounds 5–7
24 sc.
Round 8
2 sc, dec around — 18
Round 9
sc, dec around — 12
Stuff firmly.
Round 10
dec around — 6.
Close.
Sew it onto a length of tan or clear thread and suspend it approximately halfway between the upper spiral turns.
- 🧵 Top hanging cord
Use tan yarn.
Cut approximately 30 cm.
Fold in half.
Attach the two ends to the top of the spiral/lighthouse assembly.
Make a small loop at the top.
For the thicker braided appearance in the photo, use three strands and braid them together.
- Snow around lighthouse base
For the snowy island at the bottom, crochet an oval.
Use white.
Row 1
Ch 18.
2 sc in 2nd ch from hook, sc across, 4 sc in final chain, sc along opposite side, 2 sc in final stitch.
Continue around the oval.
Work 3–4 rounds, increasing at the ends so it stays oval.
Then add the same fluffy white scallop:
sl st, ch 3, 4 dc in same stitch, sl st
around the outer edge.
Place the lighthouse in the center.
- Attach the spiral around the lighthouse
This is the part that makes the ornament look like the photograph.
Starting near the top:
Attach the narrow end of the ocean ribbon near the hanging cord.
Bring it outward.
Curve it downward.
Wrap it around the lighthouse.
Continue outward on the opposite side.
Bring it back around.
Repeat for approximately 4–5 complete rotations.
Gradually reduce the diameter toward the bottom.
Use small hidden stitches at the back to anchor the ribbon.
Shape
Think of it approximately like:
- Bottom crystal
At the very bottom, attach a clear faceted bead/crystal.
Use clear nylon cord or strong white thread.
Make a small loop through the lowest point of the spiral and attach the crystal securely.
A 15–25 mm faceted acrylic crystal gives the closest effect to the photograph.
- Final shaping
The photograph has a fairly rigid, sculptural appearance. To achieve this:
Mix approximately:
1 part white craft glue + 1 part water
Lightly brush the blue spiral only with the mixture.
Shape it around a bottle, vase, or similarly sized cylindrical object.
Allow to dry completely.
For a softer ornament, skip the stiffener and simply secure the curves with hidden stitches.
Suggested color palette
Part Color
Deep wave Navy
Main wave Turquoise
Highlight Light blue
Snow White
Lighthouse White
Windows/railings Navy
Roof Bright red
Ball Tan/camel
Hanging cord Tan
Crystal Clear
Key trick
The most important part isn’t the exact stitch count—it’s keeping the ocean strip approximately 4–5 cm wide, making the white edging deliberately irregular, and shaping the strip into progressively smaller coils around the lighthouse. That’s what creates the distinctive 3-D spiral shown in your picture.
If you want, I can also turn this into a proper row-by-row printable pattern with a stitch chart/diagram for the spiral, lighthouse, roof, ball, and snow edging.