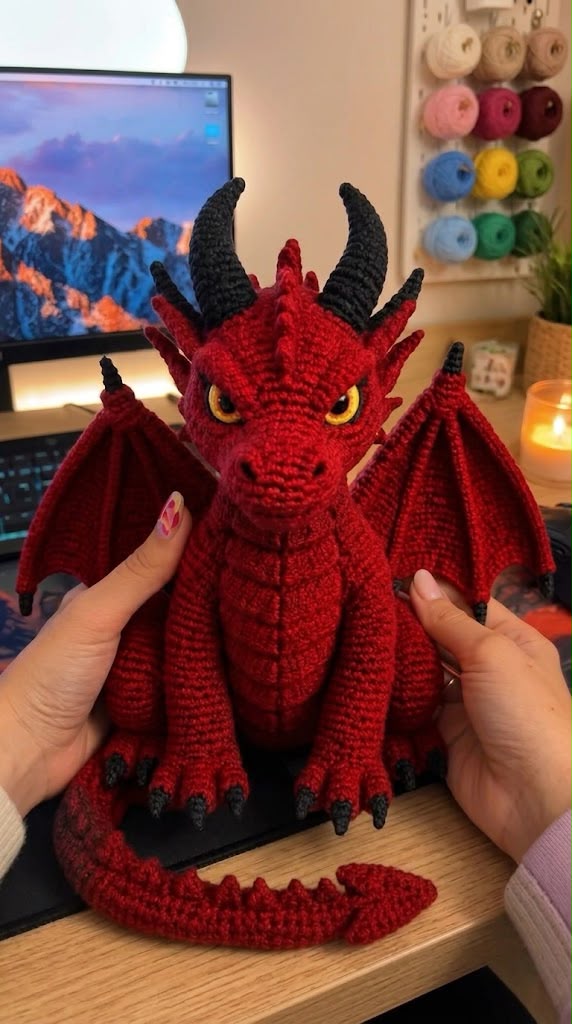
Red Amigurumi Dragon — Full Crochet Pattern
Finished size: approximately 35–40 cm (14–16 in) tall when made with medium-weight yarn
Skill level: Intermediate/advanced
Construction: crocheted in continuous rounds unless otherwise stated
Materials
Red worsted/aran weight yarn — approximately 500–600 g
Black worsted/aran yarn — approximately 50–75 g
Small amount of yellow/gold yarn or felt for eyes
Small amount of white/cream yarn for eye highlights
Crochet hook 3.5 mm
Crochet hook 4.0 mm for wings, if desired
Polyester fiberfill
12–16 mm safety eyes, or embroidered eyes
Tapestry needle
Stitch markers
Scissors
Pipe cleaner or craft wire for optional tail/wing support
Fabric glue, optional
Abbreviations
MR — magic ring
sc — single crochet
inc — increase, 2 sc in one stitch
dec — invisible decrease
sl st — slip stitch
ch — chain
hdc — half double crochet
dc — double crochet
BLO — back loop only
FLO — front loop only
st/sts — stitch/stitches
FO — fasten off
Numbers in parentheses are the stitch count at the end of the round.
- HEAD
Work in red.
Rnd 1: 6 sc in MR (6)
Rnd 2: inc around (12)
Rnd 3: (sc, inc) × 6 (18)
Rnd 4: (2 sc, inc) × 6 (24)
Rnd 5: (3 sc, inc) × 6 (30)
Rnd 6: (4 sc, inc) × 6 (36)
Rnd 7: (5 sc, inc) × 6 (42)
Rnd 8: (6 sc, inc) × 6 (48)
Rnd 9–15: sc around (48)
Begin shaping the face.
Rnd 16: 14 sc, (inc, sc) × 4, 14 sc (52)
Rnd 17: sc around (52)
Rnd 18: 15 sc, (inc, 2 sc) × 4, 13 sc (56)
Rnd 19–22: sc around (56)
Place the eyes between approximately rounds 15–19, leaving 10–12 stitches between them.
Rnd 23: (12 sc, dec) × 4 (52)
Rnd 24: (11 sc, dec) × 4 (48)
Rnd 25: (6 sc, dec) × 6 (42)
Rnd 26: (5 sc, dec) × 6 (36)
Rnd 27: (4 sc, dec) × 6 (30)
Start stuffing firmly.
Rnd 28: (3 sc, dec) × 6 (24)
Rnd 29: (2 sc, dec) × 6 (18)
Rnd 30: (sc, dec) × 6 (12)
Rnd 31: dec × 6 (6)
FO and close.
Shape the cheeks and muzzle by pushing a small amount of stuffing toward each side of the face.
- MUZZLE / SNOUT
Work in red.
Rnd 1: 6 sc in MR (6)
Rnd 2: inc around (12)
Rnd 3: (sc, inc) × 6 (18)
Rnd 4: (2 sc, inc) × 6 (24)
Rnd 5–7: sc around (24)
Rnd 8: (2 sc, dec) × 6 (18)
Rnd 9: sc around (18)
Lightly stuff.
Rnd 10: (sc, dec) × 6 (12)
Rnd 11: sc around (12)
FO with a long tail.
Sew the muzzle to the lower front of the head.
Nostrils
Using black yarn, embroider two small oval nostrils near the upper portion of the muzzle.
For the characteristic dragon expression, make the nostrils slightly angled inward.
- BODY
Work from the bottom upward in red.
Rnd 1: 6 sc in MR (6)
Rnd 2: inc around (12)
Rnd 3: (sc, inc) × 6 (18)
Rnd 4: (2 sc, inc) × 6 (24)
Rnd 5: (3 sc, inc) × 6 (30)
Rnd 6: (4 sc, inc) × 6 (36)
Rnd 7: (5 sc, inc) × 6 (42)
Rnd 8: (6 sc, inc) × 6 (48)
Rnd 9: (7 sc, inc) × 6 (54)
Rnd 10: (8 sc, inc) × 6 (60)
Rnd 11–25: sc around (60)
Start tapering.
Rnd 26: (8 sc, dec) × 6 (54)
Rnd 27: sc around (54)
Rnd 28: (7 sc, dec) × 6 (48)
Rnd 29–30: sc around (48)
Rnd 31: (6 sc, dec) × 6 (42)
Rnd 32: sc around (42)
Rnd 33: (5 sc, dec) × 6 (36)
Stuff very firmly, especially the lower body.
Rnd 34: (4 sc, dec) × 6 (30)
Rnd 35: (3 sc, dec) × 6 (24)
Rnd 36: (2 sc, dec) × 6 (18)
Rnd 37: (sc, dec) × 6 (12)
FO and leave a sewing tail.
Attach the head securely to the top of the body.
- BELLY
The dragon in the photograph has a raised, segmented belly. This can be created as a separate panel.
Work in red, using slightly tighter tension.
Row 1: ch 9, sc across (8)
Row 2: ch 1, turn, inc, 6 sc, inc (10)
Row 3: ch 1, turn, sc across (10)
Row 4: ch 1, turn, inc, 8 sc, inc (12)
Row 5: sc across (12)
Row 6: inc, 10 sc, inc (14)
Row 7: sc across (14)
Continue increasing at both ends every other row until the panel is approximately 18–20 cm long and 12–14 cm wide.
Finish with a round of sc around the entire panel.
Sew the belly panel vertically onto the front of the body.
Belly ridges
Using red yarn, sew horizontal curved lines across the belly panel every 2–3 cm.
Pull the yarn slightly tight to create the raised segmented appearance visible in the photograph.
- FRONT LEGS
Make 2.
Work in red.
Rnd 1: 6 sc in MR (6)
Rnd 2: inc around (12)
Rnd 3: (sc, inc) × 6 (18)
Rnd 4–7: sc around (18)
Rnd 8: (sc, dec) × 6 (12)
Rnd 9–25: sc around (12)
Stuff lightly in the upper section and more firmly near the shoulder.
FO with a long tail.
Sew the legs to the front sides of the body.
Angle them slightly outward.
- FRONT FEET
For each foot, work in red.
Rnd 1: 6 sc in MR (6)
Rnd 2: inc around (12)
Rnd 3–5: sc around (12)
Flatten slightly.
Three claws
Using black yarn, make three small claws on each foot.
For each claw:
ch 4
sl st back down the chain
FO
Sew the three claws to the front of the foot.
Attach each foot to the bottom of its corresponding front leg.
- HIND LEGS
Make 2.
Rnd 1: 6 sc in MR (6)
Rnd 2: inc around (12)
Rnd 3: (sc, inc) × 6 (18)
Rnd 4: (2 sc, inc) × 6 (24)
Rnd 5–9: sc around (24)
Rnd 10: (2 sc, dec) × 6 (18)
Rnd 11–18: sc around (18)
Stuff firmly.
Flatten the opening slightly and sew to the lower sides of the body.
- HIND FEET
Make 2.
Rnd 1: 6 sc in MR (6)
Rnd 2: inc around (12)
Rnd 3: (sc, inc) × 6 (18)
Rnd 4–6: sc around (18)
Stuff lightly.
Sew the feet onto the front of the hind legs.
Add three black claws to each foot using the same method as the front claws.
- TAIL
Work in red.
Rnd 1: 6 sc in MR (6)
Rnd 2: (2 sc, inc) × 2 (8)
Rnd 3: sc around (8)
Rnd 4: (3 sc, inc) × 2 (10)
Rnd 5–7: sc around (10)
Rnd 8: (4 sc, inc) × 2 (12)
Rnd 9–11: sc around (12)
Rnd 12: (5 sc, inc) × 2 (14)
Rnd 13–16: sc around (14)
Rnd 17: (6 sc, inc) × 2 (16)
Rnd 18–21: sc around (16)
Continue in this manner, increasing approximately 2 stitches every 4–5 rounds.
After the tail reaches approximately 35–40 cm, begin decreasing gradually:
(6 sc, dec) × 2
then several rounds of sc.
Continue decreasing until 6 stitches remain.
Stuff progressively as you crochet.
For a poseable tail, insert a length of pipe cleaner/craft wire before closing. Leave the wire completely enclosed inside the stuffing and yarn.
FO and sew the tail to the rear of the body.
Curve it forward along the floor for the same silhouette as the photograph.
- HORNS
Make 4–6 depending on how many spikes you want.
Use black yarn.
For a large horn:
Rnd 1: 6 sc in MR (6)
Rnd 2: sc around (6)
Rnd 3: (2 sc, inc) × 2 (8)
Rnd 4–5: sc around (8)
Rnd 6: (3 sc, inc) × 2 (10)
Rnd 7–8: sc around (10)
Rnd 9: (4 sc, inc) × 2 (12)
Rnd 10–11: sc around (12)
Do not stuff heavily.
Pinch and curve the horn slightly backward.
FO with a long sewing tail.
Make two large horns and two smaller side horns.
Sew the large horns to the top of the head, angled outward and backward.
Sew the smaller horns around the sides/back of the head.
- HEAD SPIKES
Make approximately 8–12.
Use red yarn.
For each spike:
Rnd 1: 4 sc in MR (4)
Rnd 2: sc around (4)
Rnd 3: (sc, inc) × 2 (6)
Rnd 4: sc around (6)
FO.
Do not stuff.
Sew the spikes around the back and sides of the head, spacing them irregularly.
For the most dramatic silhouette, make the central rear spikes slightly larger.
- WINGS
Make 2.
Use dark red yarn.
The wing consists of a crocheted membrane with raised structural ribs.
Wing base
Row 1: ch 4, sc in 2nd ch from hook, sc across (3)
Row 2: ch 1, turn, inc, sc, inc (5)
Row 3: sc across (5)
Row 4: inc, 3 sc, inc (7)
Row 5: sc across (7)
Continue increasing at the outer edge until the wing is approximately 20–25 cm long.
Shape the outer wing edge with several points:
Next row: sc, hdc, dc, dc, hdc, sc, sl st
Repeat the pointed shaping across the outer membrane as necessary.
Work a final border of tight sc around the complete wing.
Wing ribs
Using red yarn, embroider or crochet raised lines from the wing base toward each outer point.
Make 4–5 ribs per wing.
These should be visibly thicker than the membrane.
Wing claws
Use black yarn.
At the tip of each major wing finger, add a small black claw:
ch 4, sl st back down the chain, FO.
Sew the wings to the upper sides/back of the body.
Angle them outward and slightly upward.
- WING FINGERS
For a more three-dimensional wing, make 4 long fingers per wing.
Use red yarn.
For each:
ch 18–25 depending on position.
Work sl st or tight sc back along the chain.
FO.
Sew each finger from the shoulder toward a wing point.
The longest finger should reach the highest outer tip.
The remaining fingers should gradually decrease in length.
- EAR/SIDE SPIKES
Make 2 large and 4 small.
Use red yarn.
Large spike
Rnd 1: 5 sc in MR (5)
Rnd 2: sc around (5)
Rnd 3: (sc, inc) × 2, sc (7)
Rnd 4: sc around (7)
Flatten and sew to either side of the head.
Position them behind the eyes.
- EYES
For the distinctive yellow dragon eyes:
Eye base
Use yellow yarn.
Rnd 1: 6 sc in MR
Rnd 2: inc around (12)
Rnd 3: (sc, inc) × 6 (18)
FO.
Flatten into an oval and sew onto the face.
Use black yarn to embroider a narrow vertical pupil.
Add a tiny white highlight.
Eye shape
Using red yarn, stitch around the upper edge of the eye to create an angry brow.
Pull the stitches slightly tighter above the eye.
This makes the eyes appear narrowed and gives the dragon the fierce expression shown in the photograph.
- EYEBROWS / BROW RIDGES
Using red yarn, make two raised ridges above the eyes.
For each ridge:
ch 9–12.
Work sc back along the chain.
FO and sew above the eye at a downward angle toward the center of the face.
The inner ends should sit lower than the outer ends.
- MOUTH
Using black or very dark red yarn, embroider a curved line across the muzzle.
Begin beneath one cheek, curve slightly downward, then upward toward the opposite cheek.
Add a second short line beneath the first if you want a more pronounced mouth.
Do not make the mouth too wide; the photograph’s expression comes primarily from the eyes and brow.
- TEETH
Use cream/white yarn.
Make 4–6 tiny triangular teeth.
For each tooth:
ch 3.
FO and sew the chain into a small triangular point.
Attach 2–3 teeth to the upper mouth and optionally 2 to the lower mouth.
- CHEEK SPIKES
Make 6–10 small red spikes.
Use the same spike construction as the