Materials
- White worsted-weight yarn
- Red worsted-weight yarn
- Small amount of orange yarn for nose
- Black embroidery thread for eyes and mouth
- Crochet hook 3.0–3.5 mm
- Tapestry needle
- Fiberfill stuffing
- 2 small black safety eyes, 6 mm
- 2 small wooden beads for scarf ends
- Stitch marker
- Scissors
Abbreviations — US Terms
- MR = magic ring
- ch = chain
- sc = single crochet
- hdc = half double crochet
- dc = double crochet
- sl st = slip stitch
- inc = 2 sc in the same stitch
- dec = single crochet 2 together
- BLO = back loop only
- FO = fasten off
1. SNOWMAN HEAD — White
Work in continuous rounds.
Rnd 1: 6 sc in MR (6)
Rnd 2: inc around (12)
Rnd 3: (sc, inc) × 6 (18)
Rnd 4: (2 sc, inc) × 6 (24)
Rnd 5: (3 sc, inc) × 6 (30)
Rnd 6: (4 sc, inc) × 6 (36)
Rnd 7: (5 sc, inc) × 6 (42)
Rnd 8–14: sc around (42)
Rnd 15: (5 sc, dec) × 6 (36)
Rnd 16: (4 sc, dec) × 6 (30)
Rnd 17: (3 sc, dec) × 6 (24)
Begin stuffing firmly.
Rnd 18: (2 sc, dec) × 6 (18)
Rnd 19: (sc, dec) × 6 (12)
Rnd 20: dec around (6)
FO and close the opening.
Face
Place the safety eyes approximately between Rounds 10–11, about 6–7 stitches apart.
Embroider:
- a small curved black smile
- tiny pink cheeks on both sides
- an orange carrot nose
Carrot Nose
With orange yarn:
Rnd 1: 4 sc in MR (4)
Rnd 2: sc around (4)
Rnd 3: (sc, inc) × 2 (6)
Rnd 4: sc around (6)
Stuff very lightly and sew onto the face.
2. SANTA-STYLE HAT
Red Hat
Rnd 1: 6 sc in MR (6)
Rnd 2: inc around (12)
Rnd 3: (sc, inc) × 6 (18)
Rnd 4: (2 sc, inc) × 6 (24)
Rnd 5–8: sc around (24)
Rnd 9: (3 sc, inc) × 6 (30)
Rnd 10–12: sc around (30)
FO.
White Hat Band
Join white yarn at the bottom edge of the hat.
Work 3–4 rounds of sc in BLO, keeping the band slightly wider than the red portion.
Alternatively, for the ribbed appearance:
Row 1: ch 7, sc in 2nd ch from hook and across (6)
Rows 2–30: sc BLO across.
Wrap the strip around the hat and sew the ends together. Sew the band to the bottom of the red hat.
3. WHITE POM-POM
Make a small crochet ball.
Rnd 1: 6 sc in MR (6)
Rnd 2: inc around (12)
Rnd 3–4: sc around (12)
Rnd 5: dec around (6)
Stuff lightly.
FO, close and sew the pom-pom to the top of the hat.
For the fluffy appearance in the picture, you can instead make a small yarn pom-pom and trim it into a round shape.
4. SCARF
The scarf is worked in red and white stripes.
With red yarn, ch 9.
Row 1: sc across (8)
Row 2: ch 1, turn, sc across (8)
Continue for approximately 45–50 rows, changing colors every 2 rows:
- 2 rows red
- 2 rows white
- 2 rows red
- 2 rows white
Repeat until the scarf is approximately 28–32 cm long.
Add fringe to both ends using white yarn.
Cut approximately 8–10 cm strands, fold them in half and pull them through the ends of the scarf.
Wrap the scarf around the snowman’s neck and secure it with a few stitches.
Add a small wooden bead near each end if desired.
5. SPIRAL BODY
This is the distinctive long hanging section.
Use red yarn.
The easiest way to create the spiral is to crochet a long strip and then arrange it into a spiral.
Red Spiral Strip
Ch 11
Row 1: sc in 2nd ch from hook and across (10)
Rows 2–65: ch 1, turn, sc across (10)
FO.
With white yarn, make another narrow strip:
Ch 5
Row 1: sc across (4)
Rows 2–65: ch 1, turn, sc across (4)
FO.
Sew the narrow white strip along one long edge of the red strip.
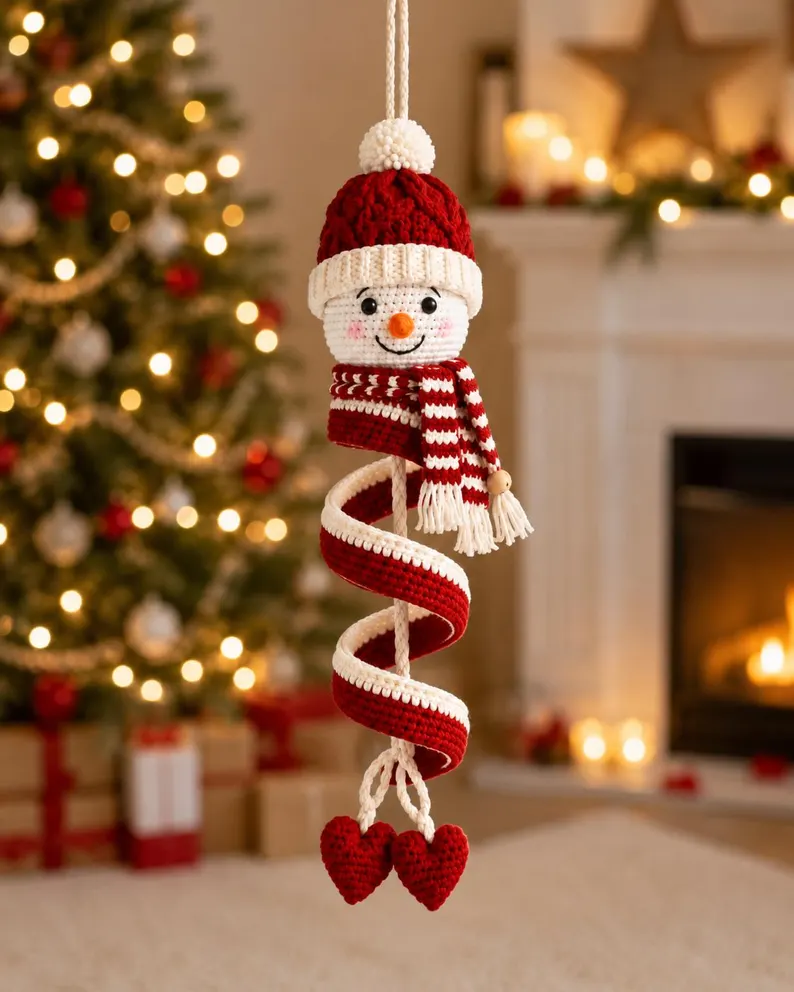
Then gently twist the completed strip into the spiral shape shown in the photo.
Alternative — Crochet the Spiral Directly
With red yarn:
Ch 5
Starting in the 2nd ch from hook, work:
sc, sc, sc, 3 sc in the last stitch
Continue crocheting around the opposite side of the chain with sc.
On subsequent rounds, increase gradually along one side while keeping the opposite side relatively straight. This naturally creates a curved ribbon.
Add a white edging with sc.
The finished spiral should be approximately 25–30 cm long.
6. INNER SUPPORT CORD
Use white yarn.
Make a long chain approximately 35–40 cm.
Slip stitch back along the chain or crochet sc across it to make a sturdy cord.
Attach the top of the cord underneath the snowman’s head.
Allow it to run through the center of the spiral.
Attach the bottom of the spiral around the cord at several points so that it maintains the shape shown in the photograph.
This cord also provides the structure for hanging the ornament.
7. HEART FEET
Make 2 red hearts.
Heart
Rnd 1: 6 sc in MR (6)
Rnd 2: (sc, inc) × 3 (9)
Rnd 3: sc around (9)
Make the two upper bumps:
First bump
Work 4 sc, then turn.
Row 1: 4 sc
Row 2: dec, 2 sc (3)
Row 3: dec, sc (2)
FO.
Rejoin yarn to the remaining stitches.
Second bump
Work the same way:
Row 1: 4 sc
Row 2: dec, 2 sc (3)
Row 3: dec, sc (2)
FO.
Sew the center valley closed and shape the heart.
Make a second heart identical to the first.
Stuff very lightly before completely closing.
8. HEART HANGING STRAPS
With white yarn, make two chains of approximately 8–10 cm.
Fold each chain into a loop.
Attach one loop to each heart.
Tie or sew the loops to the bottom of the central white cord, positioning the two hearts side-by-side.
9. TOP HANGING LOOP
With white yarn:
Ch 25–30
Join with a sl st to form a loop.
Secure the loop firmly to the top of the snowman’s hat/head.
This allows the entire snowman to hang as a Christmas ornament.
10. ASSEMBLY
Arrange the pieces in this order:
Hanging loop
↓
White pom-pom / red hat
↓
Snowman head
↓
Striped scarf
↓
Red-and-white spiral body
↓
Central white support cord
↓
Two red hearts
Use small hidden stitches to keep the spiral from unwinding.
Finishing Touches
- Brush or gently fluff the white yarn.
- Trim all fringe evenly.
- Make sure the eyes are firmly attached.
- Shape the spiral by hand before hanging.
- Hide all yarn tails inside the work.
- Lightly steam the flat spiral if necessary, keeping the iron/steam away from the acrylic yarn.
Finished size: approximately 35–45 cm from the top hanging loop to the bottom of the hearts, depending on yarn, hook size, and how tightly the spiral is formed.