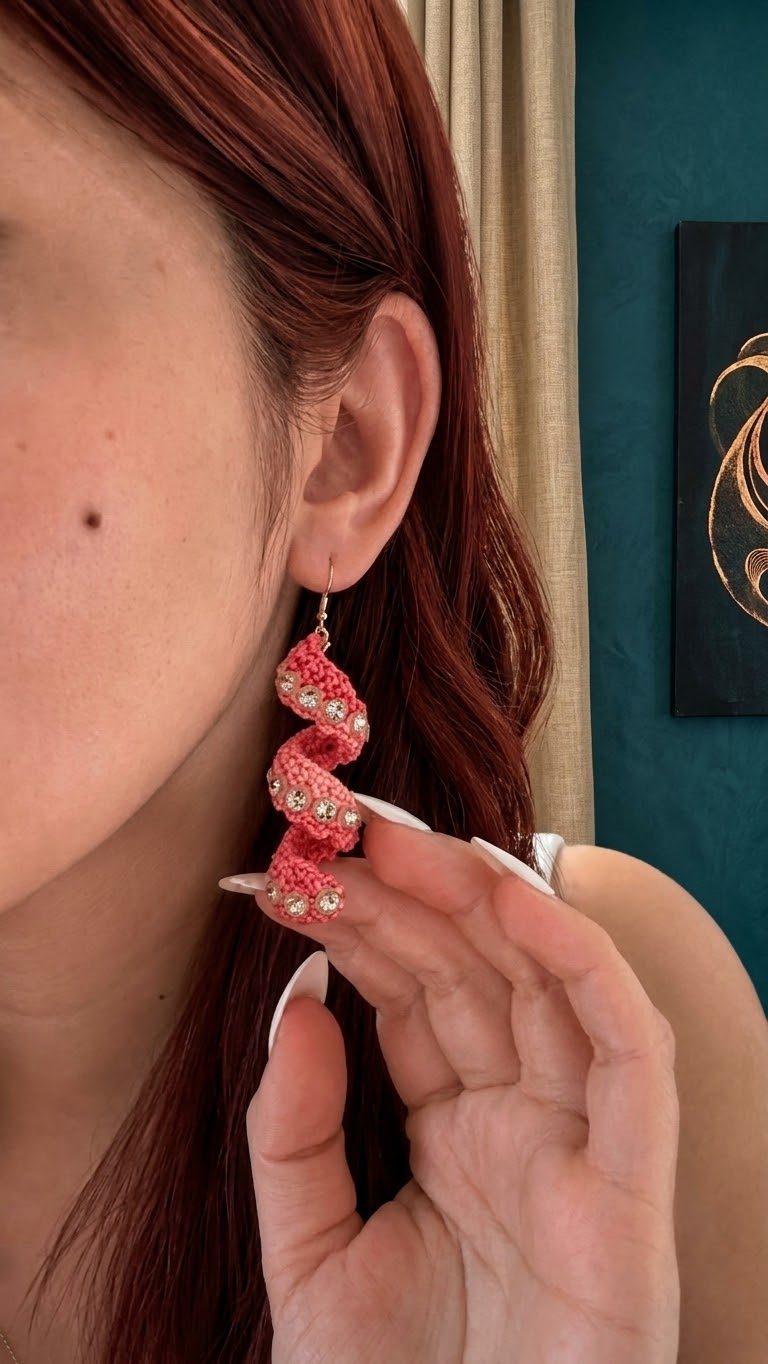
This pattern is reconstructed from the photo. The original designer’s written pattern is not visible, so the stitch counts below are designed to closely reproduce the same pink wavy/spiral crochet earring decorated with rhinestones.
Finished size
Approximately 8–10 cm long, depending on yarn and tension.
Materials
- Fine pink cotton crochet thread, approximately 1–2 mm
- Crochet hook 1.5–2.0 mm
- 10–15 small flat-back rhinestones or sew-on crystals
- Matching pink sewing thread
- Sewing needle
- 1 pair of earring hooks
- 2 small jump rings
- Jewelry pliers
- Fabric glue or strong jewelry adhesive, optional
- Scissors
- Stitch marker
Abbreviations
- ch = chain
- sc = single crochet
- sl st = slip stitch
- hdc = half double crochet
- dc = double crochet
- inc = 2 stitches in the same stitch
- dec = single crochet 2 together
Main Crochet Spiral
The earring is essentially a long narrow crocheted strip that is shaped into alternating waves.
Row 1
Ch 5.
Sc in 2nd ch from hook and in each remaining chain.
You should have 4 sc.
Row 2
Ch 1, turn.
Sc in each stitch across.
Repeat this row until you have approximately 12–14 rows.
This creates the first straight section.
First Wave
Continue working along the strip:
Row 1: Ch 1, sc in each stitch.
Row 2: Ch 1, 2 sc in first stitch, sc across, 2 sc in last stitch.
Row 3: Ch 1, sc across.
Row 4: Ch 1, sc across.
Row 5: Ch 1, dec over first 2 stitches, sc across, dec over final 2 stitches.
Row 6: Ch 1, sc across.
The strip will begin to curve.
Creating the S-Shaped Wavy Form
Continue with approximately:
6 rows sc
Then:
Increase section
Ch 1, inc, sc across, inc.
Work 3 rows sc.
Decrease section
Ch 1, dec, sc across, dec.
Work 4 rows sc.
Repeat the increase and decrease sections 2 more times.
The important part is to gently curve each section in the opposite direction as you work. This creates the pronounced S-shaped appearance seen in the photograph.
Narrow Curved Sections
When the strip reaches approximately 6–7 cm:
Work:
Row 1: Ch 1, sc across.
Row 2: Ch 1, inc in first stitch, sc across.
Row 3: Ch 1, sc across.
Row 4: Ch 1, dec at beginning, sc across.
Row 5: Ch 1, sc across.
Repeat these five rows 2–3 times.
Finish with 3 rows of sc.
Fasten off and leave a 15 cm tail.
Shaping the Spiral
Do not leave the crochet piece completely flat.
Using your fingers, gently bend it into the same alternating curves as the photograph:
- Curve the top section toward the left.
- Curve the middle section toward the right.
- Curve the lower section toward the left.
- Curl the very bottom slightly inward.
Use a few small stitches with pink thread on the back if necessary to hold the curves in position.
Decorative Edge
For a more finished appearance, attach pink thread to one side of the strip.
Work:
Sc evenly around the outer edge.
At each sharp curve, work 2 sc into the same area to prevent puckering.
At the end, sl st and fasten off.
This gives the piece the raised border visible in the photo.
Rhinestone Placement
The photograph shows several round crystal decorations following the curved center/outer edge.
Sew or glue approximately 10–15 rhinestones along the crochet.
Suggested arrangement:
Top section: 4 rhinestones
Middle section: 4–5 rhinestones
Bottom section: 3–5 rhinestones
Try to keep the crystals following the curve rather than placing them in a perfectly straight line.
For a more secure finished earring, sew the rhinestones through the crochet rather than relying only on glue.
Attaching the Earring Hook
At the top of the crochet piece, find the center.
Using the yarn tail, create a small reinforced loop:
Ch 4–5 and join with a sl st to form a loop.
Work several sc around the loop.
Fasten off securely.
Open a small jump ring with jewelry pliers.
Pass the jump ring through the reinforced crochet loop.
Attach the earring hook.
Close the jump ring completely.
Finishing
Weave all yarn ends into the back of the crochet.
Trim excess yarn.
If using adhesive for the rhinestones, allow it to dry completely before wearing.
Gently reshape the crochet so the three sections form the characteristic zigzag/S-shaped spiral.
Important sizing adjustment
For a smaller earring, use a 1.5 mm hook and finer thread.
For a larger statement earring, use a 2.0–2.5 mm hook and slightly thicker cotton yarn.
The key to matching the photo is not simply the stitch count—the alternating increases and decreases and the manual shaping of the strip create the distinctive wavy silhouette.