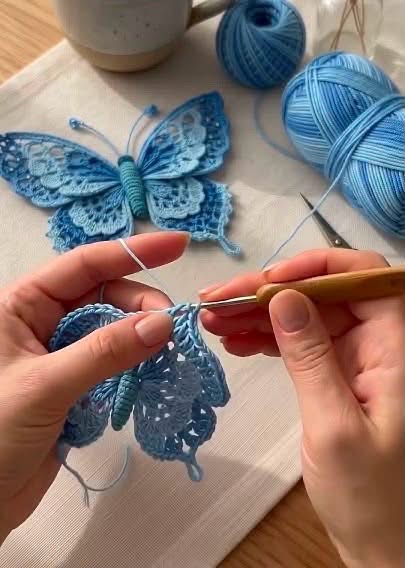
The photo shows a 3D lace butterfly appliqué with two large upper wings, two smaller lower wings, a textured center body, and delicate picot edging. Because the photo does not show every stitch, the pattern below is a reconstructed pattern based on the visible design, rather than a guaranteed exact original pattern. Similar butterfly motifs commonly use chains, double/triple crochet, picots and open lacework. (Ravelry)
Materials
- Fine cotton crochet thread or light fingering yarn
- Crochet hook 1.5–2.5 mm, depending on yarn
- Yarn needle
- Scissors
- Optional: blocking pins and starch
Abbreviations — US Terms
- ch = chain
- sl st = slip stitch
- sc = single crochet
- hdc = half double crochet
- dc = double crochet
- tr = treble crochet
- picot = ch 3, sl st into the first chain
- sp = space
- st = stitch
1. Center Body
With blue yarn:
Row 1: Ch 10.
Starting in the 2nd ch from hook, sl st across 9 sts.
Row 2: Ch 1, sc across. Turn.
Rows 3–6: Sc across, working through the back loops to create a slightly raised ribbed texture.
Fasten off, leaving a long tail.
Roll the small strip tightly from one end to the other and sew through the base to form the rounded butterfly body.
For the head, make a small loop or tight circle at the top.
2. Upper Wings — Make 2
Attach yarn to the side of the body.
Row 1:
Ch 5, 3 dc in the same attachment point, ch 4, sl st back into the body.
Row 2:
Ch 5, turn.
Work 2 dc into the first ch-4 space.
Ch 2, 3 dc into the next space.
Ch 3, sl st to the body.
Row 3:
Ch 5, turn.
In the first space work:
(2 tr, ch 2, 2 tr)
Ch 2, sc into the next space.
In the following space work:
(2 tr, ch 2, 2 tr)
Ch 5, sl st to the body.
This creates the large open upper wing.
Upper-wing decorative round
Work around the outer edge:
- sc along the first section
- hdc in the wider section
- dc around the large curve
- (dc, ch 2, dc) at the wing point
- add a 3-chain picot
- continue with sc around the remaining edge
At the inner point, sl st firmly to the butterfly body.
Repeat for the opposite wing, keeping both wings symmetrical.
3. Lower Wings — Make 2
Attach yarn below the upper wing.
Row 1:
Ch 4, 2 dc into the body, ch 4, sl st into the body.
Row 2:
Ch 4, turn.
3 dc into the first chain space, ch 3, 3 dc into the next space.
Row 3:
Ch 5, turn.
Work 5 tr into the first space, ch 2, sc into the center, ch 2, 5 tr into the second space.
Row 4 — Lace edging:
Ch 1, then work sc, hdc and dc around the outside of the wing.
At the outer points:
sc, ch 3, sl st into first ch, sc
Repeat small picots along the lower curved edge.
Join the inner part of the wing to the body with a sl st.
Repeat for the second lower wing.
4. Decorative Wing Texture
To reproduce the floral/lacy appearance visible in the photo, add small open shells inside each wing.
In selected chain spaces work:
(sc, hdc, 3 dc, hdc, sc)
Then ch 2 and continue to the next space.
For the larger upper section, use:
(sc, hdc, 5 dc, hdc, sc)
This gives the wings their scalloped, flower-like structure.
5. Antennae
Attach yarn at the top of the body.
For the first antenna:
Ch 9–12, then sl st back along several chains.
Fasten off.
Repeat on the other side.
For a curled appearance, lightly wrap the chain around your finger before securing it.
6. Finishing
- Carefully weave in all loose ends.
- Spread the four wings into a symmetrical butterfly shape.
- Lightly dampen the motif.
- Pin the wing points and scalloped edges.
- Allow it to dry completely.
- Remove the pins and gently lift the wings so they remain slightly dimensional.
Tip: For a butterfly like the one in the photo, fine cotton thread gives the best lace definition. A contrasting or darker blue thread for the body can make the center stand out.
The raised, open-lace construction and picot details are consistent with established crochet butterfly motifs, although the exact photographed design cannot be determined from the single image alone. (Ravelry)