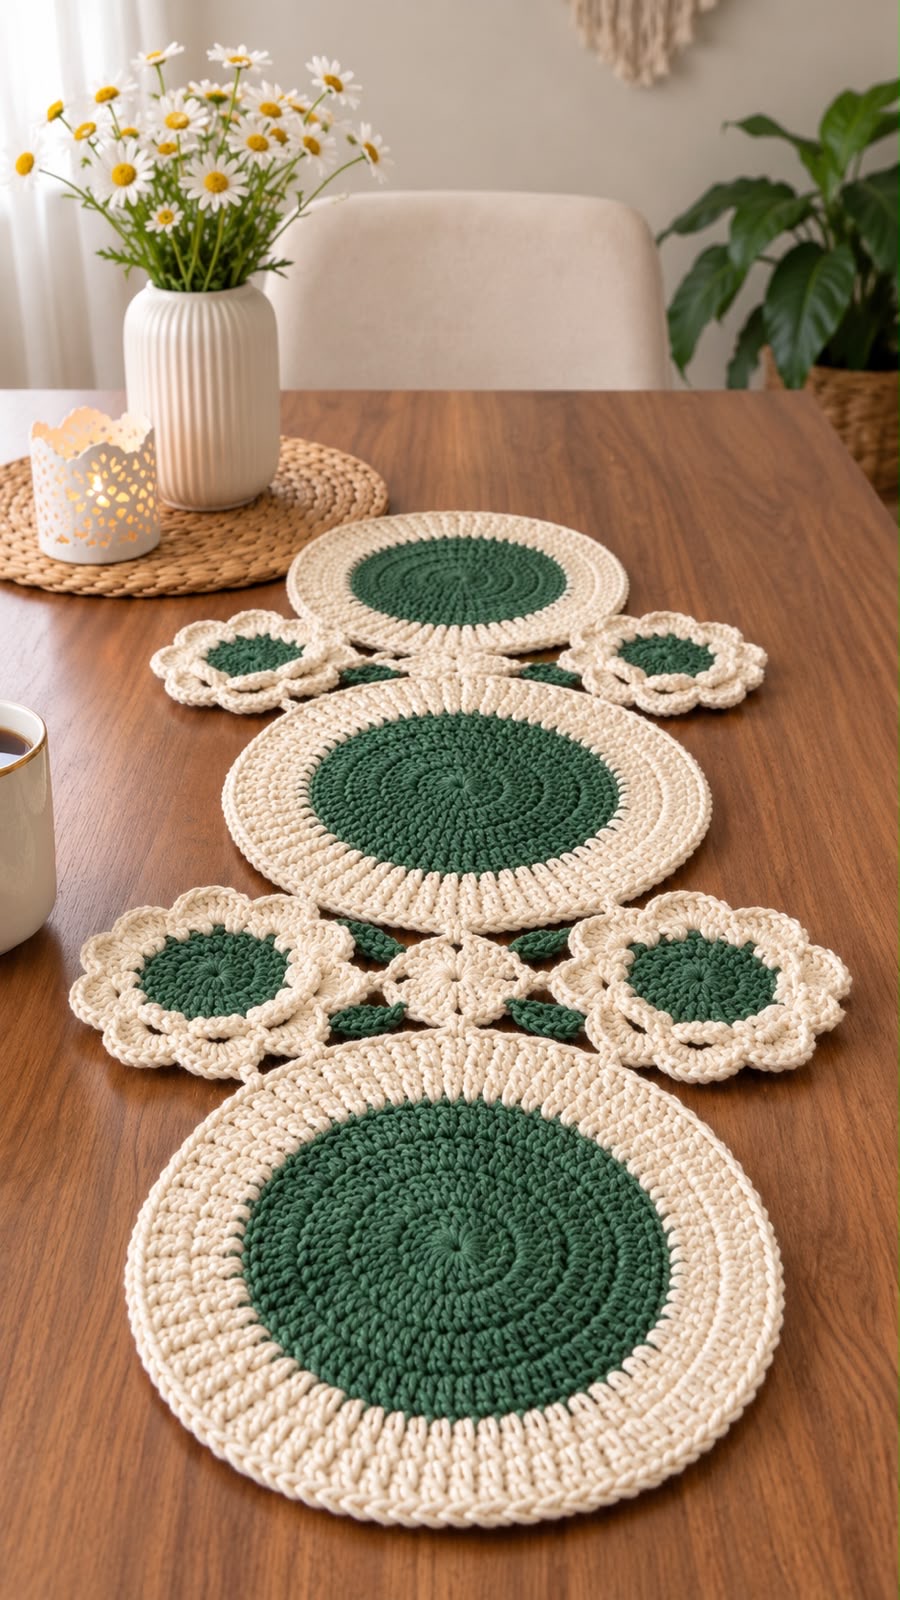
Finished look
- 3 large round green-and-cream medallions
- 4 smaller floral side motifs
- Small green round accent motifs
- Cream crocheted connecting sections
- Dark forest green center
- Natural/cream edging
- Suitable for a dining table or coffee table
Materials
- Medium cotton crochet yarn
- Forest green yarn
- Natural/cream yarn
- Crochet hook suitable for your yarn, approximately 3.5–4 mm
- Yarn needle
- Scissors
Abbreviations
ch = chain
sl st = slip stitch
sc = single crochet
hdc = half double crochet
dc = double crochet
tr = treble crochet
st = stitch
inc = 2 stitches in the same stitch
PART 1 — Large Green Medallion
Make 3 identical large circles.
Round 1
With forest green yarn, make a magic ring.
12 sc into the ring.
Sl st to the first sc.
Round 2
Ch 1.
2 sc in every stitch around.
You should have 24 stitches.
Sl st to join.
Round 3
Ch 1.
1 sc in the next stitch, 2 sc in the following stitch.
Repeat around.
36 stitches.
Round 4
Ch 1.
1 sc in each of the next 2 stitches, 2 sc in the next stitch.
Repeat around.
48 stitches.
Round 5
Ch 1.
1 sc in each of the next 3 stitches, 2 sc in the next stitch.
Repeat around.
60 stitches.
Round 6
Ch 1.
1 sc in each of the next 4 stitches, 2 sc in the next stitch.
Repeat around.
72 stitches.
Round 7
Ch 1.
1 sc in each of the next 5 stitches, 2 sc in the next stitch.
Repeat around.
84 stitches.
Continue increasing in the same way until your circle reaches approximately 28–32 cm in diameter.
Keep the increases evenly distributed so the piece stays flat.
Fasten off.
PART 2 — Cream Border
Attach cream yarn to any stitch.
Round 1
Ch 1.
Sc evenly around the entire circle.
Sl st to join.
Round 2
Ch 1.
Sc in the first stitch.
Ch 1, skip 1 stitch, sc in the next stitch.
Repeat around.
Round 3
Work a decorative shell border:
Sc in the first space.
5 dc in the next chain space.
Sc in the following chain space.
Repeat around.
Sl st to join.
Fasten off.
Make 3 large medallions.
PART 3 — Small Flower Motifs
Make 4 floral motifs.
Green center
With green yarn:
Make a magic ring.
12 sc into the ring.
Sl st to join.
Flower petals
Change to cream yarn.
Ch 3.
Work 4 dc into the same stitch.
Ch 2.
Sl st into the next stitch.
Repeat around to create approximately 6 petals.
Fasten off.
Outer border
Attach cream yarn between two petals.
Sc around the motif.
For the corners/outer curves, work 2–3 stitches into the appropriate spaces to keep the motif flat.
The finished flower should be approximately 12–15 cm wide.
Make 4.
PART 4 — Small Green Circles
Make 2–4 small circles depending on the arrangement you want.
With green yarn:
Magic ring.
Round 1: 12 sc.
Round 2: 2 sc in every stitch.
Round 3: 1 sc, 2 sc in next stitch, repeat.
Round 4: sc around.
Fasten off.
These are placed beside the floral motifs as decorative accents.
PART 5 — Connecting the Motifs
Arrange the pieces like the photograph:
Large circle
Small flower
↓
Large circle
↓
Small flower
↓
Large circle
Place two flower motifs around the upper connection and two around the lower connection.
Use cream yarn to crochet the pieces together.
For a simple connection:
Insert hook through the edge stitches of the first motif and corresponding stitch of the second motif.
Sc through both pieces.
Ch 1.
Sc through both pieces again.
Continue until the motifs are securely joined.
This creates the cream-colored connecting sections visible in the photograph.
PART 6 — Decorative Connecting Strips
For the long cream sections between the large circles:
Attach cream yarn to the edge of one circle.
Ch 3.
Dc in the next stitch.
Ch 1.
Skip 1 stitch.
Dc in the next stitch.
Repeat until reaching the second circle.
Attach with sc/sl st.
Work several rows of this open crochet structure until the connection is approximately 5–8 cm wide.
Repeat between the three large circles.
PART 7 — Final Border
Once everything is joined, work around the entire outside edge.
Round 1
Cream yarn.
Sc evenly around the complete runner.
Round 2
Ch 1.
Sc in the next 2 stitches.
Ch 2.
Skip 1 stitch.
Repeat around.
Round 3
In each chain space:
Sc, hdc, 3 dc, hdc, sc.
This creates a soft scalloped edge.
Fasten off and weave in all ends.
Finishing
Gently stretch the runner into its final shape.
Pin it flat if necessary.
Lightly block with water and allow it to dry completely.
For a look close to the photograph, use:
- Forest green: main circles and flower centers
- Warm natural cream: borders and connecting sections
- Cotton yarn: gives the firm, textured appearance shown in the photo
- Tight stitches: create the dense circular texture
Important: because the photo doesn’t show the individual stitches clearly enough to determine every round, this is a reconstructed pattern rather than the exact original pattern from the image.