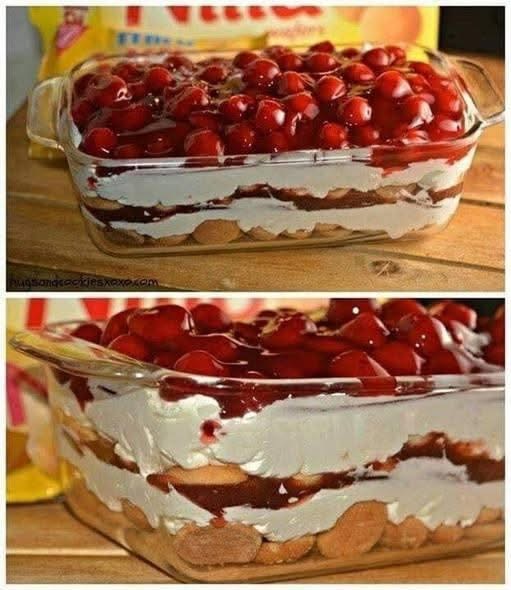
NO-BAKE CHERRY CHEESECAKE COOKIE LAYER DESSERT
This dessert tastes like a mash-up of cherry cheesecake and soft cookie bars, but with no oven, no complicated steps, and no waiting for hours and hours. It’s creamy, sweet, a little tangy, and packed with layers of cookies, cheesecake filling, and glossy cherry pie topping. Perfect for parties, family dinners, or just keeping in the fridge for an easy sweet treat.
INGREDIENTS
For the Cookie Layer
2 cups crushed vanilla sandwich cookies (like Golden Oreos)
6 tablespoons unsalted butter, melted
1 tablespoon granulated sugar
For the Cheesecake Layer
16 ounces cream cheese, softened
1 cup powdered sugar
1 teaspoon vanilla extract
1 cup heavy whipping cream, cold
For the Cherry Layer
1 can (21 ounces) cherry pie filling
1 teaspoon lemon zest (optional but brightens the flavor)
INSTRUCTIONS
Step 1: Prepare the Cookie Base
Place your vanilla sandwich cookies in a food processor and blend until fine crumbs form. If you do not have a food processor, put the cookies in a zip-top bag and crush with a rolling pin.
Transfer the crumbs to a bowl, add the melted butter and granulated sugar, and mix until all crumbs are evenly coated.
Press this mixture firmly into the bottom of an 8×8 or 9×9 pan. Use the bottom of a flat measuring cup to make it compact.
Place the dish in the fridge for 20 to 30 minutes to firm up while you work on the cheesecake layer.
Step 2: Make the Cheesecake Filling
In a mixing bowl, beat the softened cream cheese until smooth and creamy.
Add powdered sugar and vanilla extract. Beat again until no lumps remain.
In a separate bowl, whip the cold heavy cream until stiff peaks form.
Fold the whipped cream gently into the cream cheese mixture until fully combined, light, and fluffy.
Spread this mixture evenly over the chilled cookie base.
Step 3: Add the Cherry Layer
Stir the cherry pie filling with the lemon zest if using.
Spread the cherry mixture over the cheesecake layer, making sure it reaches all corners of the pan.
Step 4: Chill the Dessert
Cover the dish with plastic wrap and refrigerate for at least 4 hours, but overnight gives the best texture.
When ready to serve, cut into squares. The layers will be firm, creamy, and clean.
TIPS FOR THE BEST RESULT
- Use full-fat cream cheese. It gives the best structure and flavor for a no-bake cheesecake.
- Make sure the whipped cream has stiff peaks. This keeps the cheesecake layer thick and sliceable.
- If you want a thicker cookie crust, increase the cookies to 2 ½ cups and butter to 8 tablespoons.
- For more cherry flavor, add half a can of extra cherry pie filling on top before serving.
- The dessert lasts up to 4 days in the fridge.
FLAVOR VARIATIONS
Strawberry version: Swap cherry pie filling for strawberry.
Chocolate version: Use chocolate sandwich cookies instead of vanilla.
Lemon version: Add lemon juice and zest to the cheesecake layer.
Mixed fruit version: Use blueberry or raspberry pie filling instead of cherry.
BENEFITS OF THIS DESSERT
No oven required, quick and beginner-friendly, easy to customize, and perfect for serving a crowd. The combination of silky cheesecake and buttery cookie crust makes it taste like a bakery dessert with minimal effort.
If you want, I can also write a bigger version, a history section, or a version without canned filling.