Discover The Ultimate Frozen Tray Dessert Recipe that’s perfect for any occasion! Easy to make, delicious, and sure to impress your guests.
Table of Contents
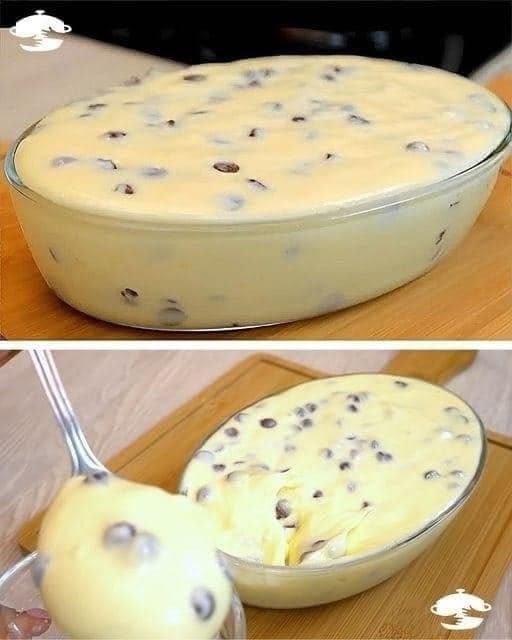
Frozen tray desserts have revolutionized the way we think about sweet treats. Easy to prepare, endlessly customizable, and visually stunning, they’ve become a go-to choice for parties, family gatherings, or a quiet indulgence. Whether you’re a seasoned dessert enthusiast or a beginner in the kitchen, this recipe will guide you through creating a crowd-pleasing dessert that’s as delicious as it is effortless.
What sets this recipe apart? Its adaptability. You can use your favorite flavors, toppings, and textures to create something truly unique. Plus, it’s a no-bake recipe, saving you the hassle of turning on the oven. Ready to make your perfect frozen tray dessert? Let’s get started!
How to Prepare the Ultimate Frozen Tray Dessert Recipe Step by Step
Creating a frozen tray dessert starts with choosing the right ingredients. These components form the foundation, ensuring your dessert is flavorful, creamy, and indulgent.
Primary Ingredients
- Base Options
The base is crucial for structure and texture. Popular options include:- Cookies: Crushed Oreos, graham crackers, or digestive biscuits add a crumbly texture.
- Brownies: A rich, fudgy layer can elevate the decadence.
- Biscuits: Tea biscuits or shortbread provide a lighter, buttery flavor.
- Creamy Layers
A creamy layer is essential for that melt-in-your-mouth experience. Options include:- Ice Cream: Choose store-bought or homemade varieties.
- Whipped Cream: Adds an airy, light texture.
- Mascarpone or Cream Cheese: For a tangy, rich flavor.
Additional Flavors and Toppings
- Fruits
Add freshness with fruits like:- Strawberries, blueberries, or raspberries.
- Tropical choices such as mango or pineapple.
- Chocolates and Caramels
Drizzle with chocolate sauce, caramel, or fudge for extra indulgence. - Nuts
Incorporate a crunch with pecans, walnuts, or almonds.
Step-by-Step Guide to Preparing Frozen Tray Desser
Follow these steps to craft a frozen tray dessert that’s sure to impress.
Step 1 – Preparing the Base
Start by choosing and preparing your base.
- Crush cookies or biscuits until they form fine crumbs. Mix with melted butter to create a firm crust.
- For a brownie base, bake a thin layer in advance, or use pre-made brownies for convenience.
- Press the base firmly into a rectangular or square tray, ensuring even thickness.
Step 2 – Creating the Creamy Layers
The creamy layer defines the dessert’s richness and flavor profile.
- Whip cream or combine mascarpone with sugar for a smooth consistency.
- If using ice cream, allow it to soften slightly for easier spreading.
- Blend flavors to create complementary layers (e.g., chocolate and vanilla, or mango and coconut).
Step 3 – Assembling the Dessert
Layering is where creativity shines.
- Spread the creamy layer evenly over the prepared base.
- Add fruits, sauces, or nuts between layers for variety.
- Repeat layers as desired, finishing with toppings like drizzles or decorative fruits.
Tips for Freezing and Serving
Best Practices for Freezing
- Prevent Ice Crystals: Cover the tray tightly with plastic wrap or foil to avoid ice crystals forming.
- Chill Thoroughly: Freeze for at least 4-6 hours to set the layers completely.
How to Serve a Frozen Tray Dessert Like a Pro
- Use a warm knife for clean slicing. Dip the blade in hot water and wipe between cuts.
- Serve immediately after slicing to retain the dessert’s structure.
Customizing Your Frozen Tray Dessert
This recipe is a canvas for endless creativity. Here’s how you can tailor it to your preferences.
Seasonal Variations
- Winter Favorites: Incorporate peppermint extract and a dusting of cocoa powder for a festive twist.
- Summer Bliss: Layer tropical fruits like mango and passionfruit for a refreshing dessert.
Dietary Adaptations
- Gluten-Free: Use gluten-free cookies or brownies as a base.
- Vegan Options: Substitute dairy-based cream with coconut cream and use plant-based ice cream.
Why Frozen Tray Desserts are Perfect for Parties
Frozen tray desserts shine in party settings for several reasons.
A Dessert That Can Be Made Ahead
Prepare your dessert days in advance, freeing you up to focus on other aspects of the event. The freezer does the hard work for you, ensuring it’s fresh and ready when you need it.
Eye-Catching Presentation Ideas
Decorate with vibrant fruits, edible flowers, or intricate chocolate designs to create a visually stunning centerpiece. Use a clear tray to showcase the layers for added elegance.
Pairing Frozen Tray Desserts with Other Foods and Beverages
Enhance your dessert experience by pairing it with complementary flavors.
Beverage Pairings
- Coffee: A rich espresso balances the sweetness.
- Wine: Sweet wines like Moscato or Port are excellent matches.
- Mocktails: Fruity, tangy drinks like lemonades or berry spritzers work well.
Appetizer Suggestions
Pair with light appetizers like bruschetta or fresh vegetable platters to avoid overpowering the dessert.
Troubleshooting Common Problems
Even the best chefs face challenges. Here’s how to solve common issues.
Base Issues: Too Crumbly or Soggy
- If the base crumbles, increase the butter-to-crumb ratio.
- For soggy bases, ensure the base is fully pressed and chilled before adding layers.
Creamy Layers Not Setting Properly
- Use cream with a higher fat content for stability.
- Ensure the dessert is frozen long enough to set properly.
Fixing Overly Sweet or Bland Desserts
- Balance sweetness with tangy fruits or a sprinkle of sea salt.
- For bland layers, incorporate extracts like vanilla or almond.
Storing Leftovers and Maintaining Freshness
Proper Storage Techniques
Store leftovers in an airtight container to preserve texture and flavor.
How Long Frozen Tray Desserts Last
Frozen tray desserts can last up to two weeks in the freezer when stored properly.
Fun Facts and History of Frozen Tray Desserts
Origins of Frozen Desserts
Frozen treats date back to ancient times, with early forms appearing in China and Persia.
How Tray Desserts Became a Global Trend
The rise of no-bake recipes and convenience cooking in the 20th century helped popularize frozen tray desserts worldwide.
Frequently Asked Questions (FAQs)
- Can I Make This Dessert Without a Freezer?
Unfortunately, freezing is essential to achieve the right texture and structure. - What’s the Best Tray Size for This Recipe?
A standard 9×13-inch tray works well for most recipes. Adjust based on serving size. - Can I Use Store-Bought Ice Cream Instead of Homemade?
Absolutely! Store-bought ice cream saves time and offers a wide variety of flavors.
This comprehensive guide covers everything you need to create the perfect frozen tray dessert. Try it out, customize it to your liking, and impress your guests with a dessert that’s as easy as it is delightful!
- Old Fashioned Goulash
 IngredientsElbow macaroni, ground beef, onion, garlic, diced tomatoes, tomato sauce, beef broth or water, olive oil or butter, paprika, salt, black pepper, oregano, and optional bell peppers or chili flakes. InstructionStart by heating oil in a large pot. Add chopped onion and garlic and cook until soft. Add ground beef and brown it fully, breaking … Read more
 - Mini Chicken Pot Pie Cups
 Ingredients 2 cups cooked chicken, shredded or diced 1 cup frozen peas and carrots 1 can cream of chicken soup 1/2 cup milk 1 teaspoon garlic powder 1/2 teaspoon onion powder Salt and black pepper to taste 1 package refrigerated biscuit dough or puff pastry 1 tablespoon fresh parsley, chopped 1 egg, beaten (optional, for … Read more
 - Slow Cooker Pineapple Sausage
 Introduction Slow Cooker Pineapple Sausage is a simple and flavorful dish that combines the savory taste of sausage with the sweet, tropical flavor of pineapple. Slow cooking allows the ingredients to blend perfectly, creating a delicious meal that is ideal for busy weeknights, potlucks, or family gatherings. Ingredients 1 lb smoked sausage, sliced into rounds … Read more
 - Cheesy Beef Biscuit Bombs
 Ingredients 1 pound ground beef 1 cup shredded cheddar cheese 1 teaspoon garlic powder 1 teaspoon onion powder 1/2 teaspoon salt 1/2 teaspoon black pepper 1 can refrigerated biscuit dough 1 tablespoon melted butter 1 teaspoon parsley flakes Instruction Preheat the oven to 375°F (190°C). Cook the ground beef in a skillet until browned. Drain … Read more
 - Slow Cooker Garlic Herb Pot Roast
 Introduction Slow Cooker Garlic Herb Pot Roast is a comforting and flavorful meal that transforms a simple beef roast into a tender, juicy dinner. Slow cooking allows the meat to absorb a rich blend of garlic, herbs, and savory seasonings, creating a hearty dish perfect for family meals or special gatherings. Ingredients 3 to 4 … Read more