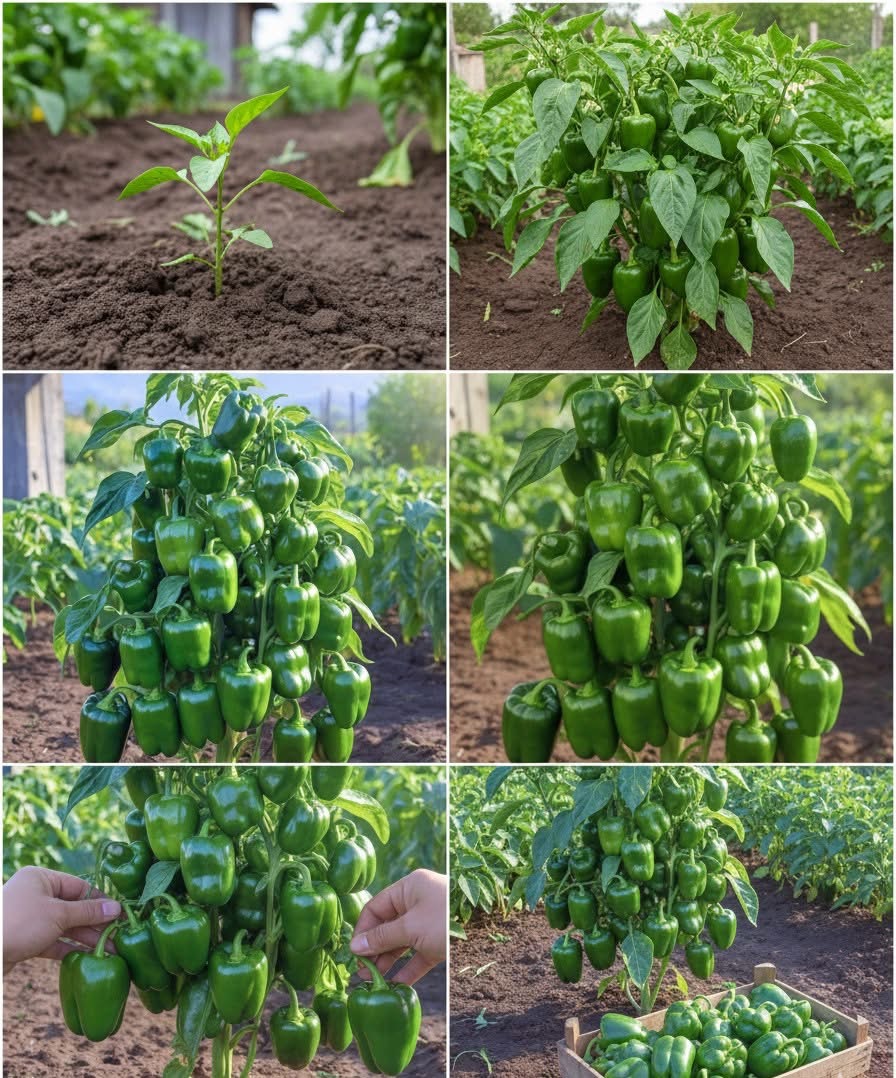
Bell peppers are one of the most rewarding vegetables to grow: compact plants that produce glossy, crunchy fruits in abundance when managed correctly. The photo you shared — from seedling to a heavy, fruit-laden plant and full crate of harvest — shows exactly what’s possible with good technique. This article walks you through everything: from choosing varieties to step-by-step methods, and the formation (plant shaping / training) that helps plants carry heavy yields without breaking.
1. Quick overview & why grow bell peppers
Bell peppers are warm-season, fruiting vegetables that thrive in sunny, frost-free conditions. They’re versatile in the kitchen, rich in vitamin C, and attractive in the garden. With the right soil, water, nutrients and a little training, one plant can produce a large cluster of peppers — like in your photo.
2. Best varieties (short note)
Choose varieties based on climate and goals:
- Blocky/market bell — classic large green/red peppers (good for stuffing).
- Sweet blocky hybrids — higher yields and disease resistance.
- Compact/bush types — for containers or short seasons.
(Variety names vary regionally; pick ones recommended for local heat/disease conditions.)
3. Growing conditions (what peppers need)
- Light: 6–8+ hours of full sun per day.
- Temperature: Ideal 20–30°C daytime; night >13–15°C. Cold slows growth and reduces fruit set.
- Soil: Deep, well-drained, loamy soil; pH 6.0–6.8.
- Fertility: Moderately fertile — too much nitrogen = lush leaves, few fruits. Balanced N-P-K with extra calcium reduces blossom end rot.
- Water: Even moisture; avoid water stress during flowering & fruiting.
4. Preparation & planting method (step-by-step)
A. Starting seeds
- Start indoors 8–10 weeks before last frost (or earlier in very cool climates). Use seed trays with seed-starting mix.
- Keep soil warm (24–28°C) and moist; seedlings emerge in 7–14 days.
- Provide bright light (grow light or sunny window) to prevent leggy seedlings.
- Pot up once first true leaves appear; harden off 7–10 days before transplant.
B. Site preparation
- Choose a sunny bed, raised beds or large containers (≥20 L).
- Work in organic matter (compost) and a balanced slow-release fertilizer.
- Amend with lime if pH is low; add bone meal or rock phosphate for bloom support if needed.
C. Transplanting
- Transplant after last frost and when soil is warm. Space 40–60 cm apart (depending on variety).
- Plant at same depth as in pot. Water in well.
- Mulch to conserve moisture and reduce soil splashing (helps limit disease).
5. Daily/weekly care method
- Watering: 2–3 times weekly deep soak (more often in containers). Keep soil consistently moist; avoid wet-dry cycles.
- Fertilizing: Side-dress with balanced fertilizer 3–4 weeks after transplant, and again at fruit set. Use a formula lower in N and higher in K during fruiting (e.g., 5-10-10) to encourage fruits.
- Weeding: Keep area weed-free. Mulch suppresses weeds.
- Support: Provide stakes/cages early before plants become heavy.
6. Formation (pruning, training & structural support)
“Formation” refers to shaping and supporting the plant so it is strong, productive and manageable.
A. Why formation helps
- Distributes fruit weight so stems don’t break.
- Improves air circulation to reduce disease.
- Focuses plant energy on fewer, larger, higher-quality fruits (optional).
B. Basic formation methods
- Single-stem stake (vertical)
- Remove lower suckers; tie a central leader to a stake.
- Works well for small plots and when you want a compact plant bearing many fruits vertically (like your photo).
- Two-stem system
- After transplant, allow the central leader and one strong lateral to form two main stems; remove other laterals. Creates a sturdier structure for heavy fruit clusters.
- Open-center (hub) formation
- Remove the top leader when plant reaches desired height to encourage lateral branching; ideal where wind or heat stress is a concern.
- Caging
- Use tomato cages or custom pepper cages to support multiple branches and allow fruit to hang on stems without sagging.
C. Practical pruning steps (gentle, not severe)
- At transplant: remove no more than 10–20% foliage.
- During vegetative growth: pinch out very low, weak shoots; keep 3–6 strong scaffold branches.
- At early bloom: do light pruning of crowded growth to improve light & airflow.
- Avoid heavy pruning once fruit sets — it reduces yield.
D. Tying and supporting fruit clusters
- Use soft ties and attach branches to stakes/cage as clusters develop.
- If a branch carries many heavy peppers, distribute weight by tying it gently upward or supporting beneath with twine loop.
7. Pollination & fruit set
- Bell peppers are self-pollinating but benefit from insect visits and gentle vibration (breezes) to move pollen.
- Provide pollinator habitat and avoid heavy insecticide use during bloom.
8. Pest & disease management (integrated)
- Common pests: aphids, thrips, whiteflies, flea beetles, cutworms. Use monitoring, hand removal, insecticidal soap or neem for moderate infestations.
- Diseases: bacterial spot, fungal blights, pepper mosaic viruses. Prevent with crop rotation, clean seedling stock, good spacing and watering at the soil level (not overhead).
- Preventive practices: rotate crops (no solanaceae in same spot for 2–3 years), treat seeds if infected, sanitize tools.
9. Harvesting method
- When to harvest: Green bell peppers can be harvested when fully blocky and glossy. Leaving them longer on plant will turn them red, yellow or orange (variety-dependent), sweeter but fewer total fruits over season.
- How: Use scissors or pruners to cut fruit with a short stem to avoid tearing branch tissue. Harvest regularly to encourage more fruit set.
- Handling: Avoid rough handling — peppers bruise easily.
10. Post-harvest & storage
- Store at 7–10°C with high humidity for best shelf life (up to 1–2 weeks).
- For longer storage, freeze after blanching or dry/slice and preserve.
11. Troubleshooting (common problems and fixes)
- Blossom end rot (dark leathery spot): Often calcium deficiency or inconsistent moisture. Fix with consistent watering, calcium amendments, avoid excess nitrogen.
- Poor fruit set: Too cool nights, excessive nitrogen, or lack of pollination. Ensure warm soil & balanced fertilization.
- Leggy seedlings: Too little light—move under brighter light or reduce stretching with lower temperatures.
- Yellowing leaves: Could be nutrient deficiency, overwatering, or root problems—check drainage and soil fertility.
12. Season timeline (example for temperate climates)
- 8–10 weeks before last frost: Start seeds indoors.
- 2–3 weeks before last frost: Pot up and gradually harden off.
- After last frost & soil warm: Transplant outdoors.
- 4–6 weeks after transplant: First flowers -> thin seedlings/prune as needed.
- 8–12+ weeks after transplant: Begin harvest; continue through the season until first frost.
(Adjust timing for your local climate — in hot regions avoid transplanting in extreme heat; in short-season areas use season extenders or grow short-season varieties.)
13. Tips for big yields like the photo
- Choose high-yield, disease-resistant varieties.
- Start with healthy, vigorous seedlings and transplant into rich, compost-amended soil.
- Use formation techniques (stake/cage + selective pruning) to keep branches supported and air moving.
- Feed carefully: modest nitrogen early, more potassium at fruiting.
- Keep water consistent and mulch well.
- Support heavy branches early and harvest regularly.
14. Small-scale & container notes
- Use large containers (≥20–30 liters) and a high-quality potting mix.
- Ensure consistent water (containers dry faster).
- Use compact or bush varieties for containers. Formation & staking still apply.
15. Final thoughts / conclusion
Growing bell peppers that look like your photo is entirely achievable with attention to seedlings, soil, water, nutrition and especially formation — the practice of supporting and shaping the plant so it can carry many heavy fruits. Start with good varieties, support branches as fruit develops, and keep conditions steady. With those methods in place, a single plant can become a small pepper tree, rewarding you with a bountiful harvest.