
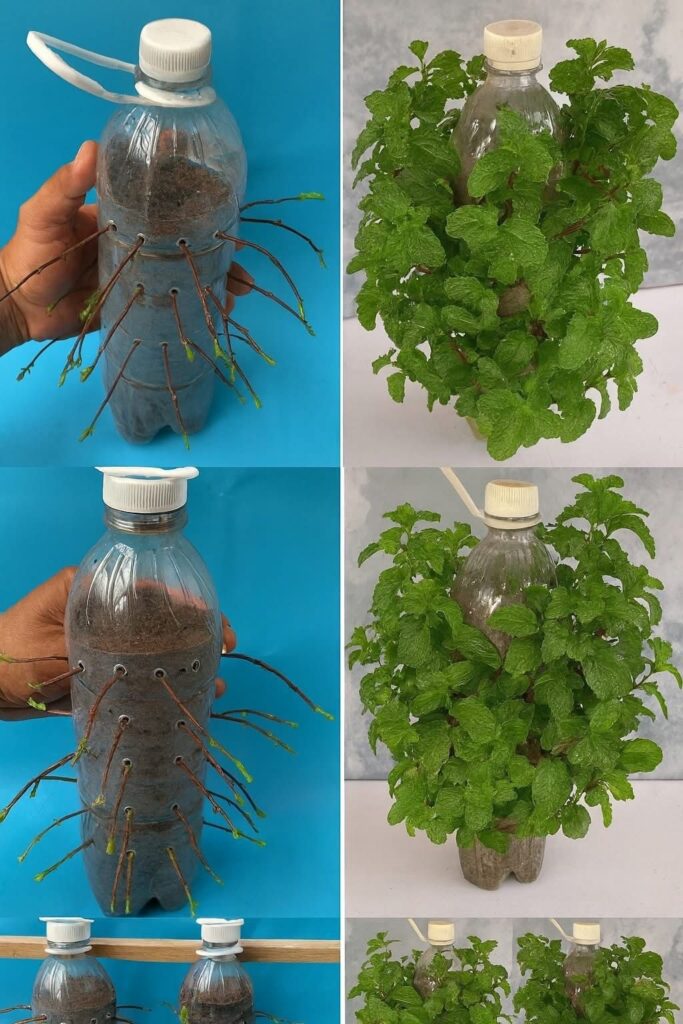
Growing fresh herbs at home is not only satisfying but also a smart way to save money while ensuring you always have healthy, chemical-free greens on hand. Mint is one of the easiest herbs to grow, and with the right technique, you can produce a lush supply even in limited spaces. The image above shows a creative method for growing mint using recycled plastic bottles. This article will guide you step by step through the process, explain the benefits, and inspire you to try this eco-friendly gardening hack.
Why Choose Mint?
Mint (Mentha) is a versatile herb used in teas, desserts, salads, and savory dishes. It’s refreshing, aromatic, and packed with health benefits:
- Aids digestion and soothes stomach discomfort.
- Rich in antioxidants that protect the body from free radicals.
- Boosts immunity thanks to its antibacterial and antiviral properties.
- Improves respiratory health by opening airways and soothing coughs.
- Adds natural flavor to drinks and meals without added sugar.
Mint is also incredibly hardy—once it starts growing, it spreads quickly, making it perfect for container gardening.
Materials You’ll Need
- 1 empty plastic bottle (1.5–2 liters works best)
- Sharp scissors or knife for cutting holes
- Potting soil (light and well-draining)
- Mint cuttings or small branches (preferably with nodes for rooting)
- Water
- Optional: string or hooks if you plan to hang the bottle vertically
Step-by-Step Instructions
1. Prepare the Bottle
- Wash the bottle thoroughly and remove any labels.
- Cut several small holes around the sides of the bottle (as shown in the image). These holes are where you’ll insert the mint cuttings.
- Leave the top open for watering.
2. Fill with Soil
- Fill the bottle with potting soil. Make sure it is moist but not soggy.
- Tap the bottle gently to eliminate air pockets.
3. Insert the Mint Cuttings
- Take fresh mint cuttings (about 8–10 cm long) and remove the lower leaves.
- Insert the cuttings through the side holes so that the nodes are inside the soil.
- The exposed part of the stem should face outward, allowing new leaves to grow freely.
4. Watering
- Water from the top of the bottle so moisture spreads evenly.
- Ensure proper drainage by making a few tiny holes at the bottom of the bottle.
5. Placement
- Place the bottle in a location with indirect sunlight. Mint loves bright, but not scorching, light.
- A balcony, kitchen window, or shaded garden area is ideal.
6. Growth and Care
- Within 2–3 weeks, you’ll see new green leaves sprouting.
- Keep the soil consistently moist. Mint prefers damp soil but avoid waterlogging.
- Trim the mint regularly to encourage bushier growth.
Benefits of This Bottle-Garden Method
- Eco-Friendly – Reuses plastic bottles, reducing waste.
- Space-Saving – Perfect for apartments, balconies, and small gardens.
- Cost-Effective – No need for pots or expensive containers.
- Easy Maintenance – Requires little effort, just watering and occasional trimming.
- Year-Round Freshness – With indoor care, you can have fresh mint all year long.
Extra Tips
- You can use this same method for oregano, basil, thyme, and parsley.
- To boost growth, add a little compost or organic fertilizer once a month.
- Hanging multiple bottles vertically creates a mini green wall of herbs.
- Harvest mint by snipping stems just above a leaf node—this encourages new shoots.
Conclusion
Growing mint in plastic bottles is an innovative, sustainable, and practical way to enjoy fresh herbs right at home. With just a few cuttings, soil, and recycled bottles, you can create a lush mini garden that not only provides flavor for your kitchen but also helps the environment. Whether you live in a city apartment or a small countryside home, this DIY vertical gardening hack makes fresh mint accessible to everyone.